
This is an ultimate guide based on how to change DHCP Lease Time in Windows 11 and Windows 10 without having a hassle.
Do you want to change the DHCP lease time in Windows 10? But you have no idea how to do it. Don’t worry.
We will provide you with the relentless ways to change the DHCP lease time, and also, how can you check the Lease time on your Computer? Continue your reading to find out the solution.
First of all, you must have a basic knowledge of what is DHCP lease time?
What Is DHCP Lease Time?
Your Internet service provides your Computer with a unique IP address in the lease for a short time tenure. It is a strenuous IP address that is valid for a short period.
After the Period of the Lease finishes, your Internet service provider will quickly change your IP address.
For that, your Computer chooses to get a unique and new IP address from the DHCP server. So, The period for which the IP address is valid is called the DHCP lease. The lease time is primarily 24 hours or 1450 minutes by default.
Quickly after 24 hours will be over, your Internet service provider will automatically renew or provide a new IP address to your computer from the DHCP server.
But some users will not be satisfied with the time and want to change their DHCP lease time.
Are you one of them and searching to change the DHCP lease time in your Windows 10? Don’t worry! We will provide you with the best ways to change the DHCP lease time of your Windows 10 Computer.
Before moving towards the steps to change DHCP lease time, you need to know the DHCP lease time for your ComputerComputer.
How To Check The DHCP Lease Time Window 10?
Below we will provide you with the steps to know about the DHCP lease time assigned to you by your Internet service provider by default:
1. Open the Command Prompt from your Windows 10
2. Type the following command in your command line windows.
ipconfig/all
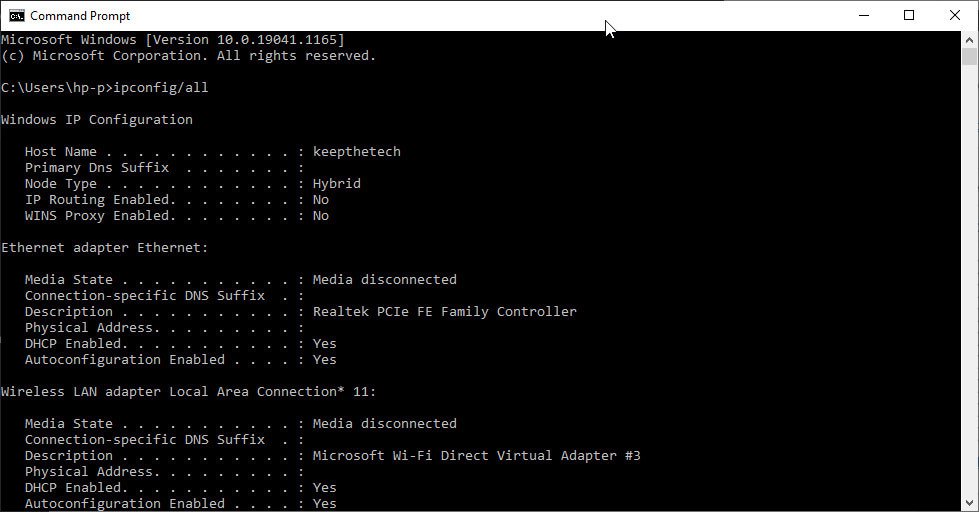
Then, you are supposed to see your lease assigned and the lease expiration time.
Moreover, If you have no idea how to open the Command prompt in Windows 10, then follow the following steps to open the Command prompt.
1. Go to the Start Menu.
2. Type cmd in the search bar
3. Right-click on the command prompt and click open as administrator.
All set, now you will find the DHCP lease time of the IP address for your computer. Let’s move toward our main steps, i.e., how to change the DHCP lease time in Windows 10?
2 Ways To Change DHCP Lease Time Windows 10
After research, we will provide you with the top 2 ways to change the DHCP lease time in Windows 10. These ways are given below:
DHCP Server
You can easily change the DHCP lease time Via DHCP Server. Belle is the steps involved:
1. Press Windows +R keys to together to open the RUN dialogue box in the Windows 10
2. Type for dhcpmgmt.msc in the box and hit OK to continue
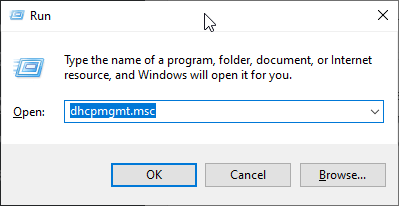
3. Select the Properties of the DHCP extent for which you wish to alter DHCP lease time
4. Select the General tab, just below the “Lease duration for DHCP clients”.
5. In the “Limited to” field, take your preferred lease time
6. Hit the OK button located at the middle of the bottom of your screen.
After completion of all the steps, make sure to reboot your computer. All set, we will make you know the steps to change the DHCP lease time.
But keep in mind that you must reboot your computer system before inspecting your updated lease time. After reboot, let’s have a look at whether the lease time changed or not.
Router
After you know the steps to change the DHCP lease time Via the DHCP server, it’s time to learn another Via router method. Below are the efforts to change DHCP lease time in your windows 10 Via Router:
1. Go to the Google Chrome web browser.
2. Enter the IP address of your router. For example 213.444.5.1,
If you don’t know what is the IP address of your Router. In this case, there are methods you can use to find out the Router IP Address.
Such as checking the back or the side of your router, contacting the router service provider and else using ipconfig command on the command prompt.
3. Then, To access router Settings, use your User ID and Password
4. Search for LAN in the settings and select the DHCP Server Module.
5. Now that you have seen the DHCP lease time, it may be set at 1440 minutes or 24 hours by default.
6. Click on it and change it according to your preference. Hit the Save button to continue.
The essential step. Reboot your Computer after all these steps. You will be updated with a new DHCP lease time after following all the steps above.
How To Find Router IP Address on Windows
If you have no idea how to know your router’s IP address before performing step two, follow the following steps to find out your IP address.
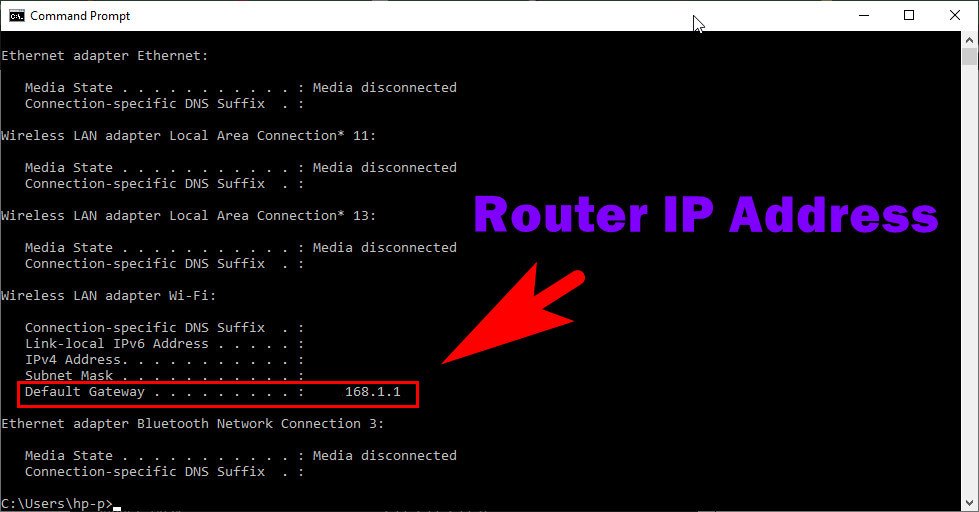
1. Go to the Start Menu given in the left corner.
2. Type cmd in the search bar and hit enter
3. Right-click on the Command prompt and select “open as Administrator”
4. The command prompt appears, type ipconfig command line and hit Enter button.
7. You will see your router’s IP address in the Default Gateway section.
Hence after performing the above steps, you will update or change your DHCP time lease in two ways, i.e., Via router and DHCP server.
Our research will provide you with the best two ways to change the DHCP lease time for your IP address in Windows 10.
An IP address is a code that can bleach your privacy, so, for privacy reasons, if you wanted to reduce the leach time from 24 hours to more minor, then the above way will help you a lot.
FAQ: Frequently Asked Questions
These are some of the frequently asked questions related to the change DHCP Lease Time on Windows with complete information.
Should I change DHCP lease time?
You don’t need to adjust the DHCP Lease time for home networks. You’ll be alright if you just leave it on default. When it comes to setting up the DHCP Server, Small Offices, Corporate Networks, and Guest Networks will require some thought.
How do I change the DHCP lease time in Windows 10?
Sign in with the admin credentials for your router. Look for an advanced options category called LAN on your router’s web interface and click on it. Select the DHCP Server tab on the router’s LAN setup page (or section). Look for a parameter named Lease time in the DHCP Server settings.
Can you modify DHCP default lease duration?
Changing the term of the lease. The DHCP lease time is controlled by the router and cannot be modified directly on your device. As a result, you’ll require administrative access to the network router that manages DHCP lease expiration.
What is a good lease time for DHCP?
The suggested time to lease an IP address is 48 hours (172800 seconds), with the IP address being renewed once a day. Clients will receive an IP address for 1 minute after applying the supplied parameters, after which they will send a request to the DHCP server for a new IP address every 30 seconds.
What is default DHCP lease time?
On most servers, the DHCP lease time default setting is 24 hours. However, depending on your server, this could be shorter or longer. From one minute to a specified number of days, the settings can be changed. You should avoid setting the lease duration too short, since this may result in service interruptions.
This is the end of this short guide.
Related Articles:
8 Ways to Fix Discord Screen Share Audio not Working
How To Fix Nintendo Switch Won’t Turn On
How to Resolve Steam Share Library Blocked
How to Close Apps in iPhone 11 – Complete Guide
How To Make An Iron Golem In Minecraft
How to Turn off Flashlight on iPhone 10
How To Delete POF Account With Screenshots
How To Transfer Call From iPhone To Mac Via FaceTime
3 Ways To Use WhatsApp on Mac Without Phone
How To Cancel A Meeting In Outlook If You Are Not The Organizer
How To Add Home Address To Google Maps
How To Turn Off SmartScreen Filter In Windows 10