How to Change Default Font in Word
Change Default Font in Word: We have various apps of Microsoft Office available out there that are Outlook, PowerPoint, Excel, and even many more.
They all arrive with the initial settings in which most of them are settled to default. It includes none other than the family of fonts, its style, size of the font, on the template document that the user has opened on the starting one.
If the requirements are not in match with the default settings, then users can easily change it.
At the time of adjustment of the various settings such as font, the procedure for it is much easier. It can be a situation where users need to use the font which is currently installed.
Most of the people get stuck in changing similar settings each of the time. People also find themselves struggling with the basic settings that require the creation of the blank document by the use of 365 subscriptions or it can be any of the versions of Office.
What are the Fonts?
The letters which are there in the software of word processing are none other than fonts. There is a various family of fonts available in the Microsoft Word. Other than this, fonts are available everywhere where there is a requirement of writing.
Documents with Various Fonts
We have seen various documents with the fonts of Times New Roman or Calibri. It becomes difficult to count it right now.
Various fonts are available out there, but the main thing is how you take the font and show it in the presentation of the document. The font must be selected which depends on the type of document you are writing.
Changing the default font in Microsoft Word version 2002
Here we have the explanation for the version 2002 as to how you can change the font of the default one in it.
Follow the given steps:-
Step 1
Firstly, we have to do the creation of the new fresh document which will be as per the template of the normal one.
If you already have opened a document, then don’t perform this. We can access it by clicking on the New located at the File menu. Then we have to click on the Blank Document which is at the task pane of New Document.
Step 2
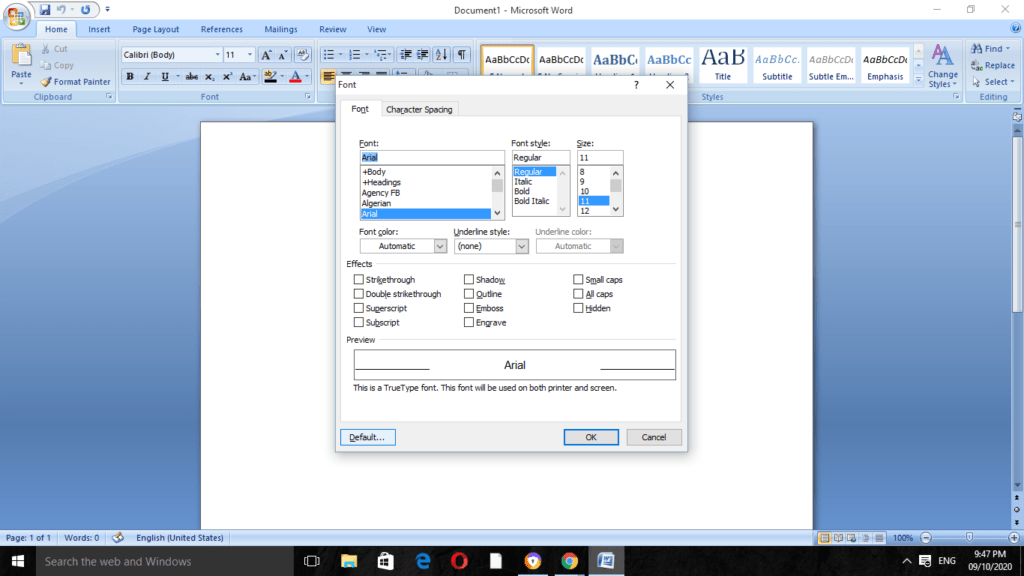
Now on the given Format menu, we have to click on the Font.
Step 3
Then do the selection of the font as well as the size of the point. Also, you can select any of the attributes if you would like to include them.
Step 4
After that, click on the Default button.
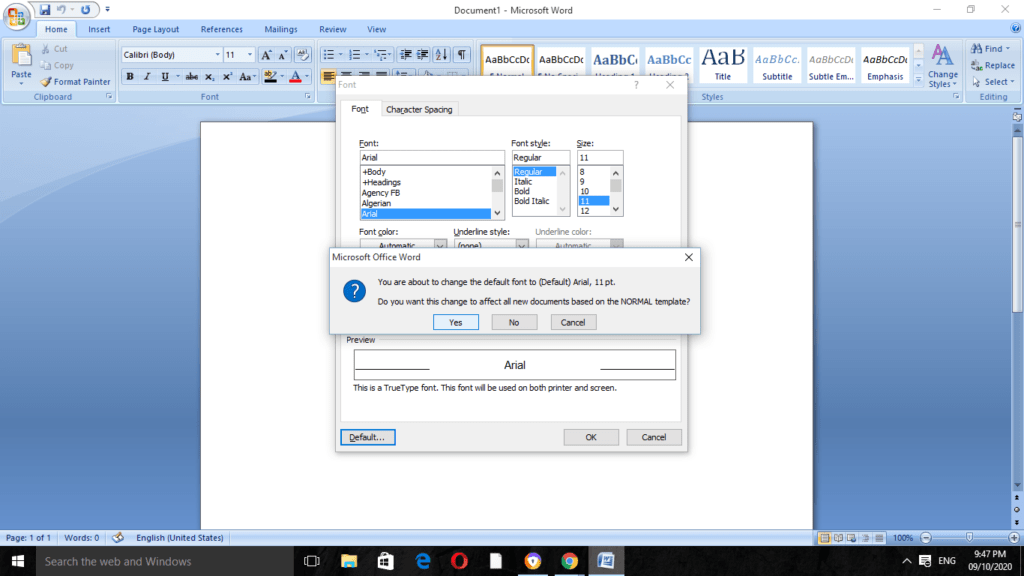
Step 5
Click on the Yes button when the message arrives thereof Do you want to change the default font to font name?
Step 6
Such an effective change will apply to all of the documents that are based on the templates of Normal one.
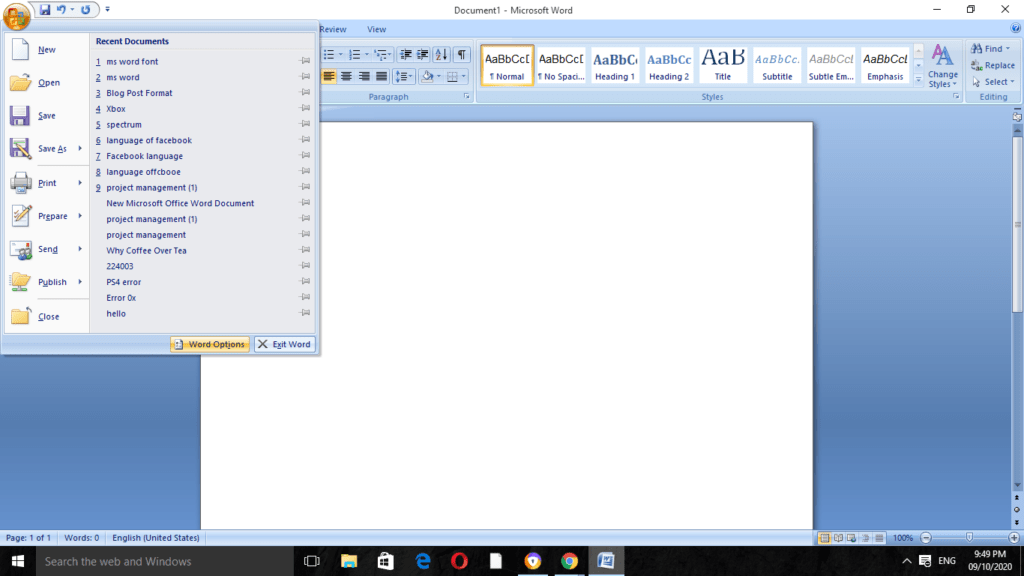
Step 7
Now on the given File menu, do hold the key of Shift towards the down and then click on the Save All button.
In Word 2007
Let’s understand how you can change the default font on the MS Word version of 2007.
Follow the given steps for it:-
Step 1
Do the creation of a new document that will be based on the template of the normal one.
For performing this, click on the button of Microsoft Office and then open New located in the New Document. It is in the task pane.

Step 2
After this, click on the Black Document, and then go to the Create option.

Step 3
Now in the given Font group, click on the option of Fonts.
Step 4
Do the selection of Font along with the size of the point and the attributes which you require in the dialogue box of Fonts.
Step 5
Click on the button of Yes when the message appears there as Do you want to change the default font to font name? It will give the effect to all the documents of the new one that is related to the template of Normal one.
Step 6
Then click on the OK button.
Step 7
Now go to the Microsoft Office Button and click there on the Word Options.
Step 8
After that, in the given tab of Customize, do the selection of Commands which is located in the list, and then do the selection of Save All.
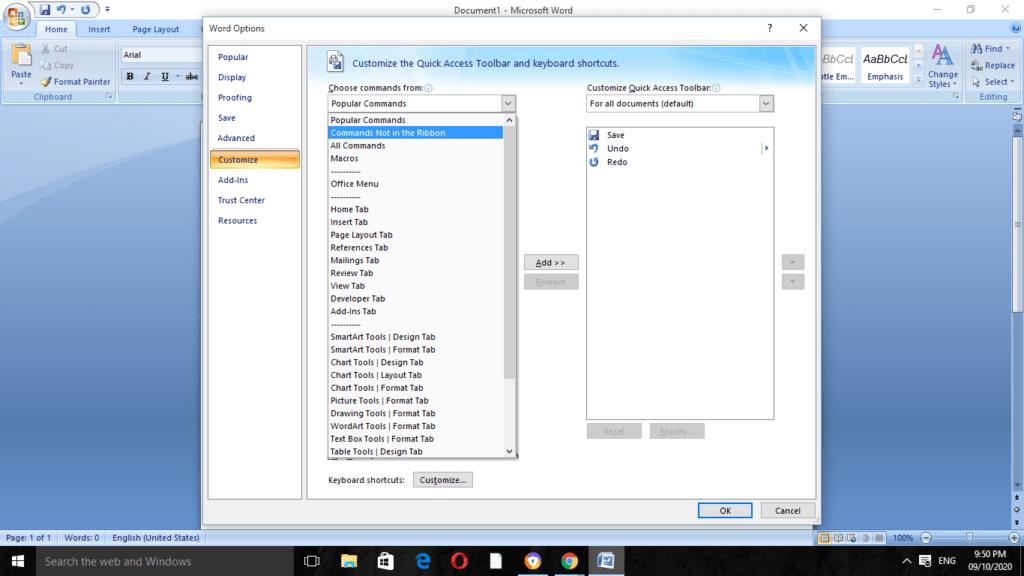
Step 9
Click on the Add button, and do the selection of Save All located in the Quick Access Toolbar of Customized one. If it asks for the saving of the document then click on the Cancel button.
In the MS Word 2010
Follow the given steps for it:-
Step 1
Do the creation of a new document that is related to the template of the normal one. For performing this, click on the File and then Open New. Then click on the Blank Document and click on the Create.
Step 2
Now in the given Font Group, do select the option of Font flyout.
Step 3
Click on the options there that you require for applying to the font for the default one. It can be the style or the size of the font. If the specific text is selected there, then the properties of it are settled in the box of dialog.
Step 4
Select there on the option of Set As Default.
Step 5
Tap on All documents that are related to the on the template of Normal.dotm option and then click on the OK button.
The reason behind the changing of Font
As we all know that different types of fonts gives a great effect on the document. Through changing the fonts one can even make it better for searching for them with a similar font. It is far easier in MS Word.
As per the latest versions of Word, we can set the font for and can also add various fonts to the document of a similar one. There is an actual no stoppage for things that we can ass to the documents.
Editing of Word Template File
If you find that the changing of default Word is not working at all, then it can be the situation that you don’t have the allowance for editing the template file of Normal.dotm.
It is such a template that is used byword for the creation of new documents which includes the settings of the default format.
For accessing of such files is not allowed to the most as they are restricted in the places of a few workplaces for security reasons.
It requires unlocking the access for editing as well as deleting the file. By removing such a file template will restore all of the default word settings of the format that you need.
Follow the given steps for it:-
Step 1
By directly searching in the Windows File Explorer as Normal.dotmin the given field and clicking enter, we can go on with it. Now Windows will start for searching for the template file.
Step 2
Now click on the Normal file and then tap on Properties.
Step 3
In the given window of Normal Properties, take a proper check that the tab of General is in selection there.
Step 4
Do uncheck the checkbox of Red-only in the given section of attributes for giving the allowance for changes to the file that you have prepared.
Step 5
Save it now. It will give you the allowance for making the required changes to the settings of Word Formatting in default form.
FAQ: Frequently Asked Questions
These are some of the frequently asked questions related to the set default font in word with complete information.
In MS Word 2019, how do I set the default font?
Follow these steps
1.Any Word document can be opened.
2.Choose “Font” from the context menu when you right-click in the page.
3.Select your favourite typeface and any other options you want to change in the Font dialog box (e.g., font size).
4.Select “Set As Default” from the drop-down menu.
How do I alter Word’s default style?
Select Font from the Format menu, then the Font tab. Make any necessary adjustments, then choose Default. Note: The Normal style is the foundation for the majority of Word’s styles. Modifying the default font impacts the Normal style, and that in turn affects any other styles that are based on it.
In Word, how can I keep my font from changing?
Here are the steps you need to follow in order to keep font changing in MS Word.
1.As from Format option, choose Style.
2.Select a style name from the list of styles.
3.Select Modify from the drop-down menu.
4.Make absolutely sure the Automatically Update option is unchecked at the bottom of the dialog box.
5.To dismiss the Modify Style dialog box, click OK.
6.To close the Style dialog box, click Close.
In Office 365 online, how can I change the default font?
1.To change your stationery and fonts, go to File > Options > Mail > Stationery & Fonts.
2.Choose the typeface you’d want to change.
3.Choose the font style & font size choices you would like to apply to the default font.
4.To save your changes, select OK together all way out.
Wrapping Up
For the users who need to work daily on MS Word, such a method for the setting of the default font can save a lot of time for them. Users can also create their own templates in MS Word and can even set their own page sizes, fonts, and many more.
There are various more features that one can access. As MS Word is a wonderful creation, we can keep exploring and making documents on it.
Related Articles:
3 Ways To Change Default Google Account
How to Change Language on Facebook
How to Insert Footnote in Word?
How to Change Default Font in Word