
Here in this guide, we show how to fix Nvidia Container High CPU Usage on Windows 11, 10 and later versions.
Nowadays, maximum users use PC for gaming purposes first, and then it goes for work purposes. For a great gaming experience, people use to add NVIDIA graphics cards to the CPU to increase efficiency.
People use NVIDIA graphics for this reason only, and actually, it works to increase the gaming experience.
But sometimes, due to overheating, CPU slowdowns and issues start. Users will see that the gameplay is not good enough, which it should be.
There might be many reasons why NVIDIA graphics is taking more memory, but it should be fixed ASAP. Otherwise, it might hamper the CPU as well.
Reasons for Why Nvidia Container is Not Working
The possible reason the Nvidia container is taking some more memory than it should is if the user is overclocking or the CPU is doing some unusual activity without the owner knowing it.
Some possible reasons are the following, which are seen in most of the new NVIDIA drivers:
A driver update might be the reason, as new drivers are becoming problematic for everyone, and it’s only for the people who reverted to the old version of NVIDIA drivers.
Geforce is often mentioned as the main cause of this problem in the PC. Geforce is one additional software that is used in this NVIDIA for making it more effective. If, after booting up the PC, it remains on the black screen, it prevents the driver from performing some major functions.
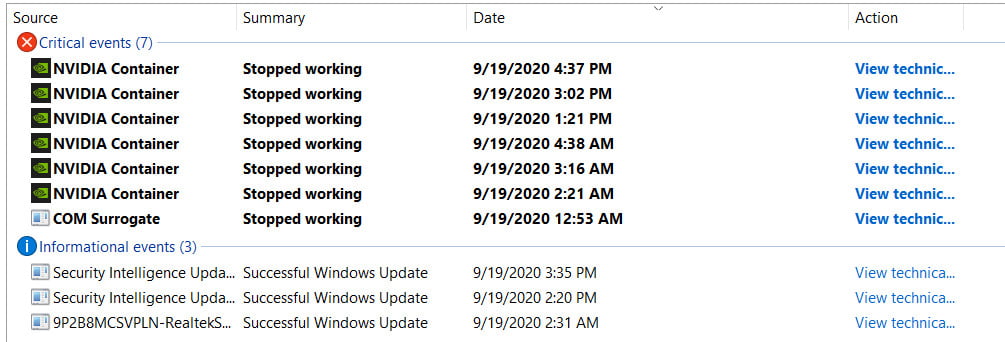
The NVIDIA container is the usual culprit and the problem can be resolved by disabling its tasks and removing it from the PC.
Some of the ways are given in the following to fix it down.:
Install Older NVIDIA Drivers
Many users who are using NVIDIA driver had faced this problem, and for solving it, they have installed the old version to work properly.
As NVIDIA has updated their new drivers, but it is not effective at all, getting back the older version will help solve this problem. To make this work, the user has to do the following steps:
1. Click on the start menu, type “Device Manager,” and select the first one to open the device manager. There is another method for opening the device manager. That is, the user can open it from “RUN” as well.
2. Since the Nvidia container is a video card driver, the user has to update it on the PC, first expand the display adapters section, right-click on the graphics card, and then choose the uninstall device. After that, the device driver starts uninstalling process.
3. Confirm if any dialogue box or prompt asks you to confirm the uninstallation of the current graphics device driver and wait for the completion of the process.
4. Now, look for the graphics card on NVIDIA input that requires information about the card and operating system and click on the search option.
5. list of all available drivers should appear on the page. Make sure that you have to scroll down until the required entry option arrives. Click on the name and the download button.
Uninstall GeForce Experience
GeForce enhances the gaming experience with every device. After installing NVIDIA then the user can see GeForce GTX graphics card will be there.
This card is developed by NVIDIA and will remain until it is uninstalled. It keeps drivers up to date, helps optimize the game options, and gives users the option to click screenshots or video recordings during the game.
But now the issues are arising with it, most of the devices face the same problem: PC usages are increasing automatically even if it is in idle mode.
As per the officials, this application can be removed, and it won’t change any gaming optimization. After removing this, it can help in the Nvidia container.
1. Click on the start menu, go to Settings, and open the control panel in windows 10.
2. In the control panel, change the “View as” option present in the top right part of the windows to select any category and click on the uninstall a program option in the program section.
3. Now, find the GeForce experience entry on the list and click on it. Now click on the “uninstall” button, which will appear in the list, and confirm if any dialogue box asks. After completing these steps, the user can restart the computer, and it will work accordingly.
Disable NVIDIA Telemetry Container Service
NVIDIA telemetry container is a service installation with NVIDIA software in use to keep track of logs, behaviour, and other similar data on the user’s PC. It can be used to inform the NVIDIA of bugs and reports for undesired behaviour.
Many users who were facing these issues reported that they are using the PC after completing this step as it was. So the following are the steps to complete this method.
1. Open the control panel by locating it in the start menu or search it from the “Start”.
2. After the control panel opens, change the “View by” option at the top right part of the windows for having large icons and scroll down until the administrative tools are located.
Click on that option and then locate the Task scheduler shortcut at the right top. Then click on the option to open the task scheduler as well.
3. The task is located under the Task scheduler library. Now locate all the tasks whose names start with “NvTm,” right-click on those tasks, and choose to disable them from the context menu, which will appear.
4. After disabling all this process, you can disable the NVIDIA telemetry container service from auto startup on the PC. This will help to solve Nvidia container high usage on PC.
Turn off “nvdisplay.container.exe” Completely
The main problem with the Nvidia container is this. When any new software or driver is installed, then a new file directory will be created.
This file does not let the function work properly and creates further issues, and deleting these files is 100% safe. This might be confusing for many, but it might be the reason for the Nvidia container’s high usage on PC. To delete these files users have to perform the following steps:
1. Navigate to the location given below
C:\Program Files\NVIDIA Corporation\Display.NvContainer\plugins\LocalSystem\This can vary if the user has installed the driver at any other location.
2. Select the “DisplayDriverRAS” folder and press “Shift”+ “delete” on the keyboard. After that, move to a new directory that is “C:\Program Files\NVIDIA Corporation\”
3. Completely remove the “DisplayDriverRAS” folder from here.
4. Now move to “task manager” page and then end the “nvdisplay.container.exe” process.
5) After completing all these steps, restart the PC and check if any other issues arise.
After completion of this process, the problem for the Nvidia container will be solved.
Restart the Computer
This method is very simple, and for many users, almost everyone uses this to make the computer or laptop work the same and give the same performance it was giving.
To do that, the user has to click on the start menu and then the “power” option and select the “restart” option.
Many times this works properly and makes the user’s computer the same as it was. If this does not help, then Nvidia container solving methods are given in the above.
Graphics are becoming an important part of the computer like keyboard, mouse, and speaker. During heavy usage, the CPU takes memory to regulate the function properly.
But sometimes, overclocking can damage the CPU. Now the topic comes to graphics.
Every game mostly uses NVIDIA graphics as it is one of the strongest graphics compared to other graphics cards. But some problems might arise to disturb your gaming, so using some of the methods is given above to solve the Nvidia container issues.
FAQ: Frequently Asked Questions
These are some of the frequently asked questions related to the Nvidia Container High CPU Usage with complete information.
Can I turn off nvidia container?
Locate and double-click the service Nvidia Telemetry Container. To stop the service from running, click the stop button. As the startup type, choose disabled. To finish the procedure, click OK.
Why is nvidia container using so much of my GPU?
NVIDIA Container is a critical procedure for GPU drivers since it allows other processes to operate uninterrupted. NVIDIA Container’s high CPU use is most likely due to faulty drivers. Installing or updating an older version may assist you in resolving the problem.
Do I need Nvcontainer?
NVIDIA Container, commonly known as nvcontainer.exe, is a required controller process that is mostly used to store other NVIDIA processes or activities. NVIDIA Container doesn’t perform much on its own, but it is critical for the proper operation of other processes and tasks.
Related Articles:
Record PC Gameplay With Nvidia Shadowplay & Nvidia Share
How to Install old NVIDIA Drivers in Windows 10
Nvidia Inspector: Why Should You Use It [Explained]
What is 3D Modelling Software And Its Types
5 Best Reminder App with Alarm To Install On Phone
How to use Google Meet – Step by Step Guide
10 Games to Play with Friends When Bored
How To Delete Google My Business From Google Search Engine
Top 3 Phone Hidden Features You Didn’t Know
Why You Need to Get On Board with FastestVPN Right Now
6 Fixes For Snapchat Not Working or Loading Snaps
500+ Snapchat Names – Best Snapchat Username Ideas
How to use Gzip command in Linux
Fix Ethernet Connection Windows 10 – [5 Methods]
How To Delete MeetMe Account Permanently From iPhone