
This is a comprehensive guide based on how to record a Zoom Metting on Windows and Mac devices with complete information.
Do you want to record a zoom meeting? If so, then this blog post is for you. This how-to guide will walk you through how to record your meeting on Android, iOS, Windows and Chromebooks.
Zoom meetings are quickly becoming one of the most popular video conferencing services for businesses.
It’s a great way to stay in touch with your team without the time and expense of travelling. But have you ever been to a zoom meeting and wanted to know how to record it?
You’re not alone. Luckily, there are some great ways that you can do this, depending on what type of device you have.
In this blog post, we will cover step-by-step instructions on how to record a zoom meeting on Android, iOS, windows as well as your Chromebook.
How To Record a Zoom Meeting on Android Devices
If you have an android device, then there are some great options for how to record your video meetings. Let’s take a look at them now.
Notes:
- You cannot record locally from an iOS or Android device.
- Only meeting hosts are allowed to start a cloud recording on an iOS or Android device.
Steps:
- While hosting a Zoom meeting from your Android device, tap on the More option
- This will bring out a menu. Tap on Record.
- The app will now show Recording at the top of your screen.
- To stop or pause the recording, tap More again.
- Tap the Pause button or Stop button
When the meeting is ended, the recording will be processed and displayed in Recordings on the Zoom web portal.
How to Record a Zoom Meeting on iPhones
If you have an iPhone, then the process is very similar to how it works on Android devices. Let’s take a look at how to record a Zoom meeting on an iPhone now.
Steps
1. On your iPhone, open the Zoom app and tap More. Tap Record to start recording a session.
2. To stop or pause the recording, tap More again. Tap Pause to stop and save a locally downloaded copy of your session video on your iPhone.
3. Tap Stop to end the recording and discard any changes since your last save.
4. When you are finished with the Zoom meeting, tap Done to save all your recording changes.
How To Record a Zoom Meeting on Windows Devices
Unlike Android and iPhones, with your windows pc, you can record a zoom meeting locally. This means that your recordings (both video and audio) will be saved on your computer.
After that, you can then decide to upload your recording to a cloud service, such as Google Drive or Dropbox.
How To Enable Local Recording for an Account
1. Sign in to the Zoom web portal as an administrator. This will grant you the ability to edit the account settings.
2. Click on Account Management then select Account Settings. Click on the Recording tab.
3. Under the Recording section, toggle the Local Recording button either to enable or disable local recording.
4. A verification dialogue might appear. If so, click Enable or Disable to confirm the change.
5. (Optional) To allow the host to permit to record locally, check the “Hosts can give meeting participants permission to record locally” box.
6. If you want to, you can lock the setting to ensure that it is used by every user in your account. To do this, click the lock icon and then click Lock to confirm this setting.
How to Enable Local Recording for a Group
1. Sign in to the Zoom web portal as an administrator. This will grant you the ability to edit the account settings. Click on Groups.
2. Select the group that you want to edit and click Edit Group Settings.
3. Under the Recording section, toggle Local Recording to enable or disable local recording.
4. A verification dialogue might appear. If so, click Enable or Disable to confirm the change.
(Optional) To allow the host to permit to record locally, check the “Group Members can give meeting participants permission to record locally” box.
If you want to, you can lock the setting to ensure that it is used by every user in your account. To do this, click the lock icon and then click Lock to confirm this setting.
How to Enable Local Recording for a User
To enable or disable local recording for your use:
1. Log in to the Zoom web portal. In the navigation panel, click Settings.
2. Click the Recording tab. Toggle the Local Recording button either to enable or disable it.
3. A verification dialogue may appear, select Turn On to verify the change.
4. If the option isn’t highlighted, it means it has been blocked at either the group or account level, and you will need to contact the support team for help.
(Optional) To allow the host to permit to record locally, check the “Group Members can give meeting participants permission to record locally” box.
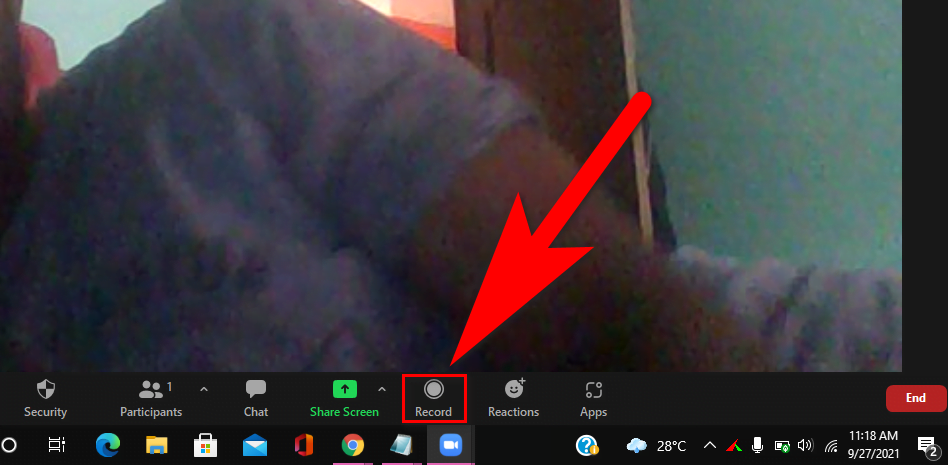
How To Start a Local Recording on Zoom
To start a local recording session:
1. Start a Zoom meeting as the host. Click the More menu.
2. Select Record to start recording your session locally.
3. Select “Record on This Computer” if there is a menu.
4. If you’re the host, the following recording indicator will be shown in the top-left corner while the recording is ongoing.
5. If you’re a participant, the following recording indicator will be shown in the top-left corner while the recording is ongoing.
6. To see which participants are currently recording, Click on Participants.
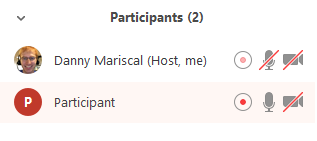
Note: Dial-in participants will be notified via a message that the meeting is now being recorded. This can be disabled by the host.
7. After the meeting, Zoom will convert the recording so you can view the files.
8. Immediately the conversion process is over, the folder containing the recording files will automatically open.
9. By default, the filename for the full recording will be video[random number].mp4. The audio-only file (M4A) will be named audio[random number].m4a. The file’s extension, however, may be modified to whatever label you like.
Key Notes:
- If the meeting is unexpectedly closed or if the conversion process is interrupted, the recording files may become corrupt and irretrievable. For example, The conversion process will be interrupted if you restart your computer, put the disk to sleep, or close your laptop.
- If the conversion operation fails after the meeting, you may try to manually convert the recording.
- The meeting may be recorded in several different layouts, including Active Speaker, Gallery View, and shared screen.
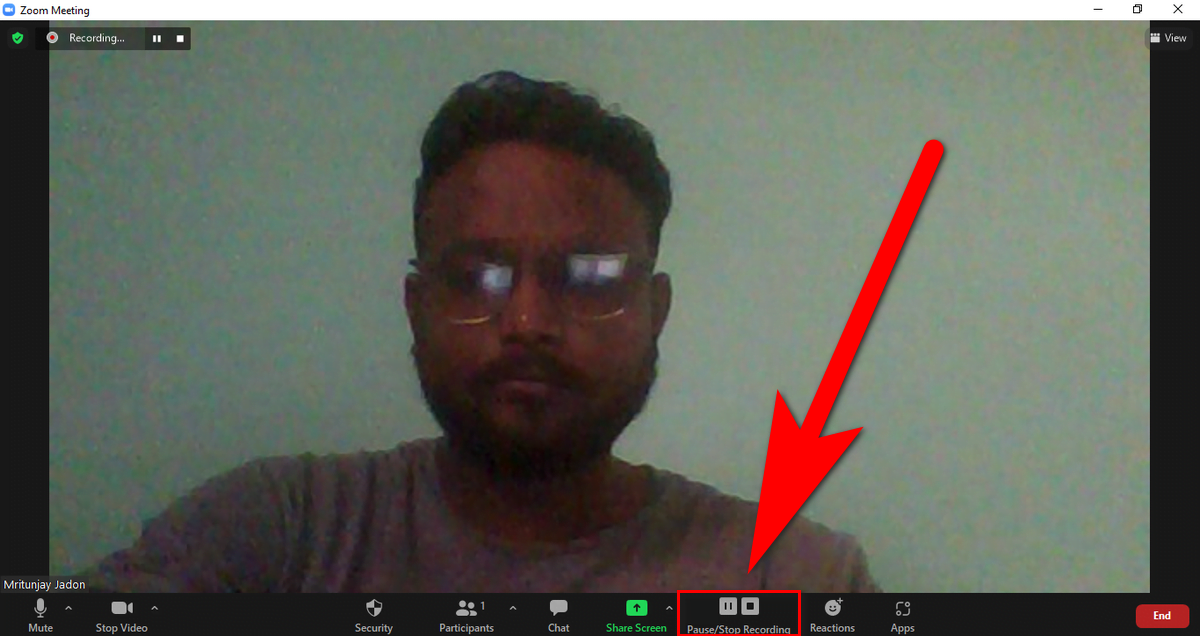
How to stop or pause a local recording
During a Zoom recording, a participant can Stop or Pause the recording. If a participant stops the recording and starts it again, a new video file will be created for the next recording segment.
If a participant pauses the recording and starts it again, Zoom will record to the same video file for the recording segment.
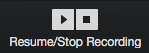
1. when a recording has been started, click Pause or Stop Recording at the bottom of the screen.
1. Alternatively, you can also stop or pause the recording by clicking the indicator in the top left corner.

2. The following indicator will be shown in the meeting when a recording is stopped.
3. Click Resume Recording at the bottom to restart recording.
3. You can also click the indicator in the top left corner to resume the recording.
How to Assign Recording Privileges to a Participant.
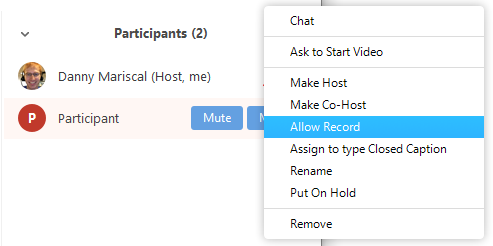
1. In a Zoom Meeting, click Participants ![]() .
.
2. Navigate to the participant who will be given recording permissions and click More next to their name in the participant’s menu. Click Allow Record.
3. The following notification will be sent to the participant:

4. When a participant is recording, the participant menu will have an icon next to the participant’s name indicating that they are recording.
5. If you want to prevent participants from recording, click More next to their names, then select Forbid Record.

The participant will be notified as follows:

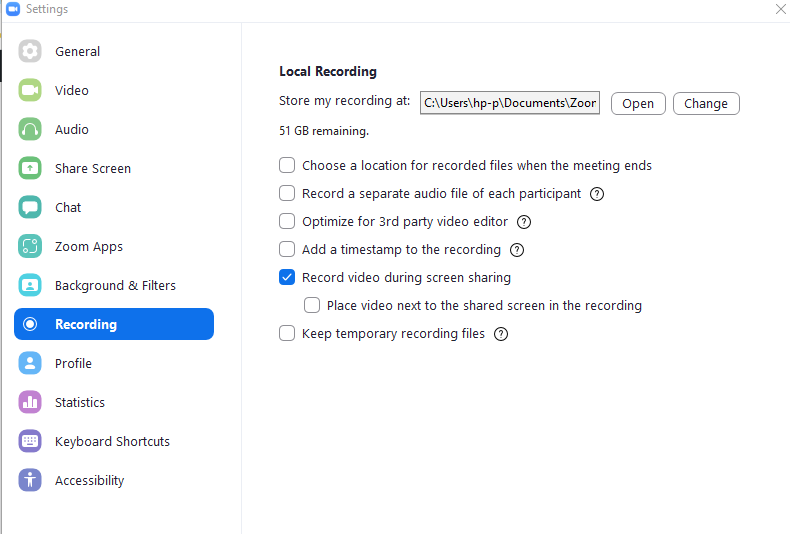
How To Record Multiple Audio Files
The local recording also enables the host to record all participants’ audio streams as separate audio files, one file for each participant. To enable this option:
1. Open the Zoom client and click Settings. Click the Recording tab.
2. Enable Record a separate audio file for each participant.
3. Record and save the meeting to your computer.
4. When the meeting has ended and the recording has been compiled, open the folder where the recording was kept.
5. Within the folder, double-click on Audio Record.
6. Each participant’s audio track is saved to the Audio Record folder as a distinct file with the file name beginning with their name.
FAQ: Frequently Asked Questions
These are some of the frequently asked questions related to the how-to edit zoom meeting with complete information.
Can you record a Zoom meeting if you are not the host?
A Local Recording can only be started by the host by default. If another member wants to record the meeting, the host must give them permission during the meeting.
Does Zoom record your whole screen or just the meeting?
The entire time is recorded on only one screen. The recorded format will default to Speaker view with shared screen if the host is the only one sharing video. Participants who do not turn on their camera will not be recorded.
Does Zoom record all participants screens?
When recording locally, the host can save all of the participants’ audio streams as distinct audio files, one for each. To make this option available, follow these steps: Open the Zoom client and select Settings from the drop-down menu. Select the Recording tab from the drop-down menu.
What happens when you record a Zoom meeting?
When you choose Record to the Cloud when recording a meeting, the video, audio, and chat text are saved to the Zoom cloud. The recording files can be downloaded or played through a web browser. The Zoom app for iOS and Android, as well as the desktop clients, can initiate cloud recordings.
This is the end of this short guide.
Related Articles:
How to View Passwords on Mac – Step by Step
How to Install Bluetooth Driver in Windows 10
How To Close Amazon Account – Step by Step Guide
How To Share Google Map Location
How to Turn on Google Assistant On Any Device
How To Cancel NetFlix on iPhone – Step By Step
How To Call Someone Without Showing Your Number
How to Remove the Section Break in Word
How To Give a Double Space in Word