How to Insert Text Box in Google Docs (Step by Step)
Wondering, How to Insert Text Box in Google Docs with complete information.
Adding a text box in Google docs is one of the best ways to organize your work to increase the visuality or else differ the paragraph of words in the text box on a page.
With the help of your text boxes, you can customize your google docs more professional and formal. Especially, when you have to share the document with your employees and colleagues.
Fortunately, Google does make inserting the text boxes in the Google Document as simple as the other online or offline text editors or word processing applications.
Thankfully, there are some methods that can be used to insert text boxes in google docs without having a hassle. With the help of the text boxes, you can easily able to insert text and images into the word document and place these boxes into the desired location in the document.
How To Insert Text Box in Google Docs
There are almost two methods for adding text boxes in Google Docs. In this short guide, we are going to explain both methods in a simple way with step-by-step instructions using screenshots.
Well, the first method to insert the text box in a word document is with the help of a drawing tool and the second is with a single-cell table but there is a cache each method delivers a different layout and format.
Insert Text Box in Google Docs Via Drawing Tool
Using a drawing tool to insert a text box in google docs is not an effortless method but it’s simple to implement away from which you can easily able to insert the text box without having much effort.
Moreover, with the help of the drawing tool, you can also able to perform multiple tasks such as drawing an image to Google Drive and inserting it into a word document.
Along with that, you can insert different patterns and shapes, line styles, callouts, and arrows. Basically, it opens up a dialogue box from which you can create, edit and format the shapes along with the text boxes with the help of a drawing tool.
Here are the steps you needed to follow to insert the text box in google docs using the drawing tool.
1. Go to Google Docs and navigate to the Insert > Drawing > and choose New to create a text box.
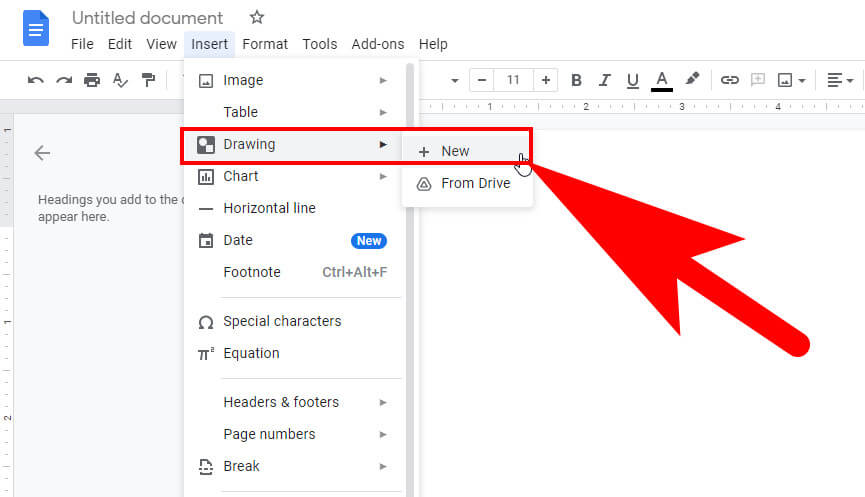
2. Select the icon of the text box.
3. Now to create the text box by the cursor and drag it to the desired location of the drawing area and release the cursor. The text box will appear on your screen.
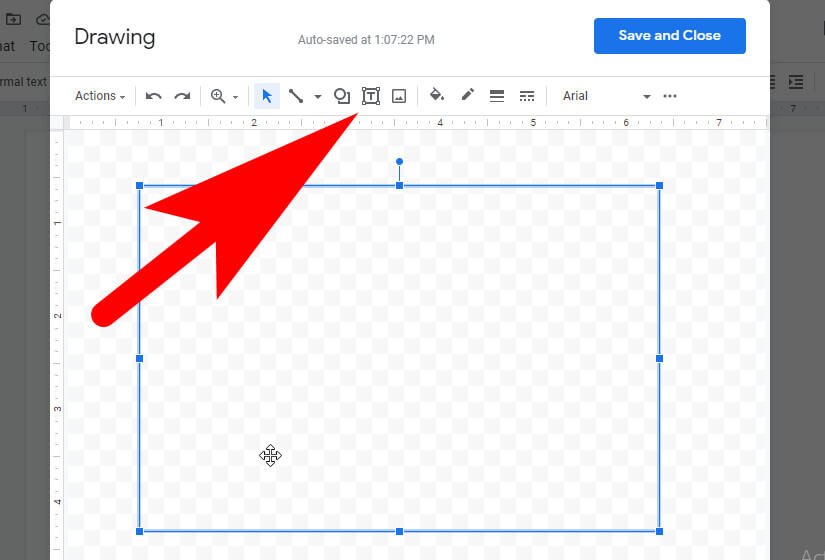
After this you’ll have to customize the text box according to requirement and when you’re done just simply select the “Save and Close” button given at the top of the screen of the drawing tool to save changes.
4. You can also edit the shape of the text box for this click on the Edit button that appears at the bottom of the text box. Moreover, you can also delete the shape by pressing the Delete and Backspace buttons together.
Insert Shapes, Arrow, Callout in Text Box in Google Docs
You can also able to insert different types of shapes into the google document the shapes include, rectangles, squares, callouts, and many more.
Google Docs also allows you to insert shapes in various shapes as you prefer into the text box and customize them by inserting them into the background colours or switching the border line height and width.
Follow the below given step-by-step institutions to better understand the process of adding shapes into the text box in Google Docs.
1. Go to the navigation bar and select Insert > Drawing > New > Shapes.

2. Now select the Shapes and choose the preferred shape form list.
3. Once you selected the shape, use the mouse cursor and drag it to the drawing area to create the selected shape into the text box, and once done release the cursor.
Well to insert the text in the shape double-tap with the shape after it enters the text.

4. Moreover you can also add more shapes, lines, arrows, callouts, or equation symbols within the drawing area. Once you’re done select the “Save and Close” button to save the changes into the text box.
If the text box is too large or small you can also resize the shape of it by clicking and dragging it to the preferred position in the document.
5. To make changes to the shape, hit the Edit button given at the bottom of the text box, and to remove it press the Delete and Backspace keys together.
Well, you also customize the shape such as colour, inserting an image, or adding the line using the edit button.
Moreover when the shapes that overlap each other can easily reposition by Bring Foward or Send Backward options to place them in the preferred position in the document.
Insert Text Box in Google Docs Via Single Cell Table
This is a second method that you use can to insert a text box in Google docs without having a hassle. With the help of the single-cell table, you can easily able to add the text box to the Google document using a single column and single row for the table.
Follow the step-by-step guide to understand the process perfectly.
1. Go to the navigation bar and select Insert > Table and after this choose a single-cell table (as shown in the screenshot).
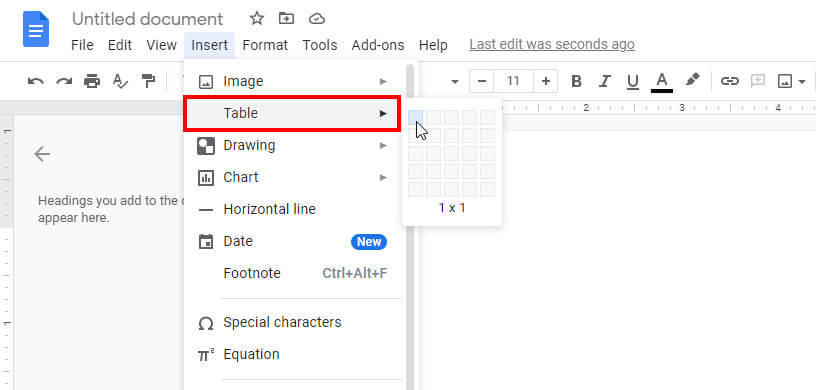
The individual table cell will appear on the screen. Now you needed to adjust the height and width of the table to the perfect size of the text box you needed in google docs.
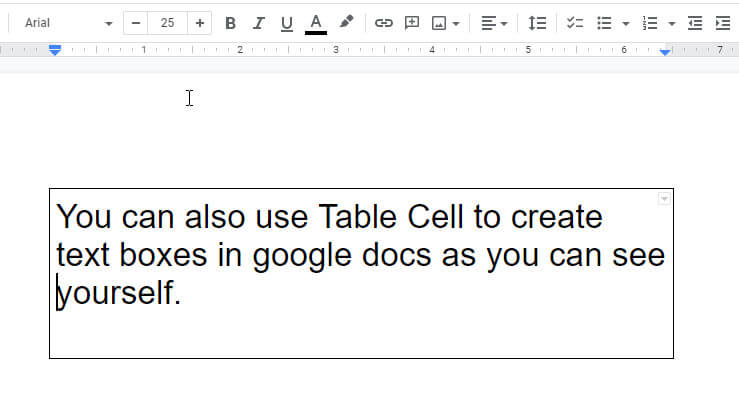
You can also change the font colour, and style along with the size as you prefer you can also highlight the text to make the display more professional.
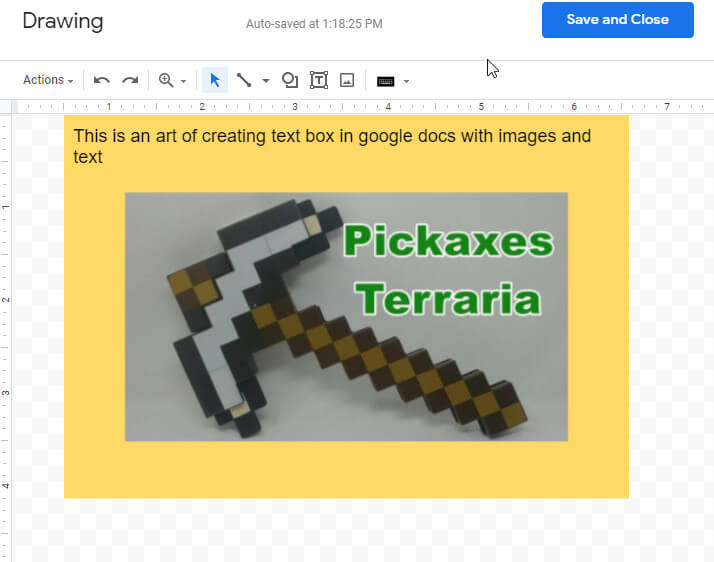
Insert Image in Text Box in Google Docs
You can also add images within the text box in Google docs to make your document more attractive or professional. To add an image into the text box you have to use the Drawing tool. Here are the complete steps to add images in Google Docs.
1. Go to the Insert > Draw > New (to create a new drawing)
2. Now create the text box in the drawing tool using click and drag.
3. After this go to the image icon and select the image that you want to add into the text box.

4. Choose the “select” button to upload the image.
In case the image is too large for the text box. Then use the mouse cursor and resize the image within the text box and place it in the preferred position in the text box. Moreover, you can also add the text next to the image to make it more professional.
5. Once you choose the image hit the Save and Close button.
You make the changes to the image such as layer the picture and the text box with the help edit button given at the bottom of the text box.
To relocate a photo in Google Docs, right-click it and select Wrap Text as the mode. Utilizing your keyboard’s scroll arrows, move the photo into position.
If you migrate the photo in tiny amounts, hold down the Shift key and move the photo with the scroll arrows.
FAQ: Frequently Asked Questions
These are some of the frequently asked questions related to the Insert Text Box in Google Docs with complete information.
Why can’t I insert a text box in Google Docs?
At the top, select insert. Then there’s the drawing. On the top bar, click the text box symbol. You may now draw a text box and fill it with text before hitting the save and close button at the top.
Can I make a text box in Google Docs?
Select Drawing from the drop-down menu after clicking Insert. The dialogue box for drawing will display. Select the Text box option. To make the text box, click and drag in the drawing area.
How do you make a text box fillable in Google Docs?
To do so, go to the menu and pick Insert, then Drawing, then New. The drawing tool will be launched as a result of this action. Select the forms icon from the menu, then Shapes, then the shape of the text box you want. The typical rectangular text boxes are used by the majority of individuals.
How do you insert an object in Google Docs?
In order to insert the object in Google Docs you need to follow these steps.
1.To launch the page editor, click the Edit page icon, which looks like a pencil.
2.Place the cursor where you want the object to go.
3.Select the object you want to insert from the Insert menu.
4.Share the Google Doc, Sheet, or Slide with the same people that are viewing your website.
Where is insert on Google Docs?
In order to access the Insert option on Google docs follows these steps.
Open a document on your PC.
Click Insert Drawing in the top left corner. New.
With the editing tools, you may add shapes, lines, and text.
Final Words
Alright! this is the end of this short guide, hopefully, you find this article helpful to understand the entire process of inserting the text box in Google docs without having a hassle.
Moreover, if you’ve any other questions related to Google Docs in this case feel free to ask us with the help of a comment box.
Related Articles:
How to Strikethrough on Google Docs
How to Find and Replace in Google Docs
How to Setup a Google Play Account for a Child
Top 3 Phone Hidden Features You Didn’t Know
7 Reasons Why Smartphone Internet is Slow as a Snail
How to Enable Virtualization in Windows 10?
What is WiFi Direct and How to Enable it In Windows 10
What is YouTube Video Manager & Where Do I Find It
How To View Spotify Play History on Android & iPhone
How to delete a group on facebook – Step by Step Guide
8 Best Bitcoin Mining Software