How to Enable Virtualization Windows 10?
Enable Virtualization Windows 10: One of the features which Windows 10 has is the capability of the creation of machines in virtual forms. Here in this topic, we will have a discussion of the creation of virtualization in Windows 10 and various other headings on it.
What is Virtualization in Windows 10?
A virtual machine is the emulation of software of the computer system. They are in creation with the physical or the real computer that gives the allowance for the creation of various separate forms of computers that can easily run the different forms of operating systems or the programs. Such virtual machines are handled by the use of special software which is named as Hypervisor Enable Virtualization Windows 10.
Here if we will discuss, then Microsoft owns the Hyper-V. As per the nature of advanced form which virtualization have, bot each of the computers can run the machines in virtual forms. This feature in the past was for the servers and was reserved for them. With the operating systems as Windows 10, users can do the creation of their own virtual machines also Enable Virtualization Windows 10.
Pre-Requisites needed to Enable Virtualization Windows 10
The basic requirements for running and for the creatiEnable Virtualization Windows 10on of virtual machines in Windows 10 is here follows Enable Virtualization Windows 10:-
- The computer processor must support the virtualization or more even Secondary Level Address Translation (SLAT).
- The edition of 64 bit of Enable Virtualization Windows 10 or the Windows Enterprise. As the Hyper-V is not there for the edition of Windows 10 Home.
- The enabling of Virtualization must be there in your computer BIOS. It is the small program that performs the handling of booting up of the computer. Take a proper check that it is located in the right place.
- The memory of 4GB. It should have RAM in extra forms.
- The hard drive space for OS Enable Virtualization Windows 10.
What is Hyper-V?
As Windows 10 use the software named as Hyper -V for handling the virtualization in it. People will need to perform the activation of they want to add virtual machines. Some of the features of Hyper-V have the ability to run the operating systems and also the whole components of hardware which includes the network switches and the hard drives. The advanced users can use them for the various server virtualizations if they require it Enable Virtualization Windows 10.
Lookup the Windows Version
For finding out the Windows version that you have, follow the given steps:-
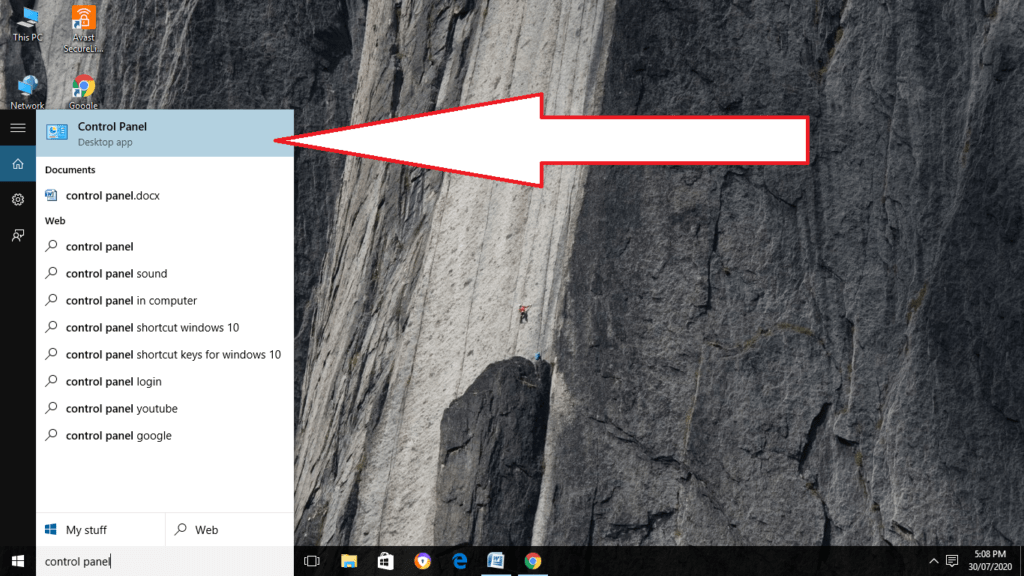
Step 1
Firstly, open the Control Panel through searching it in the given search bar Enable Virtualization Windows 10.
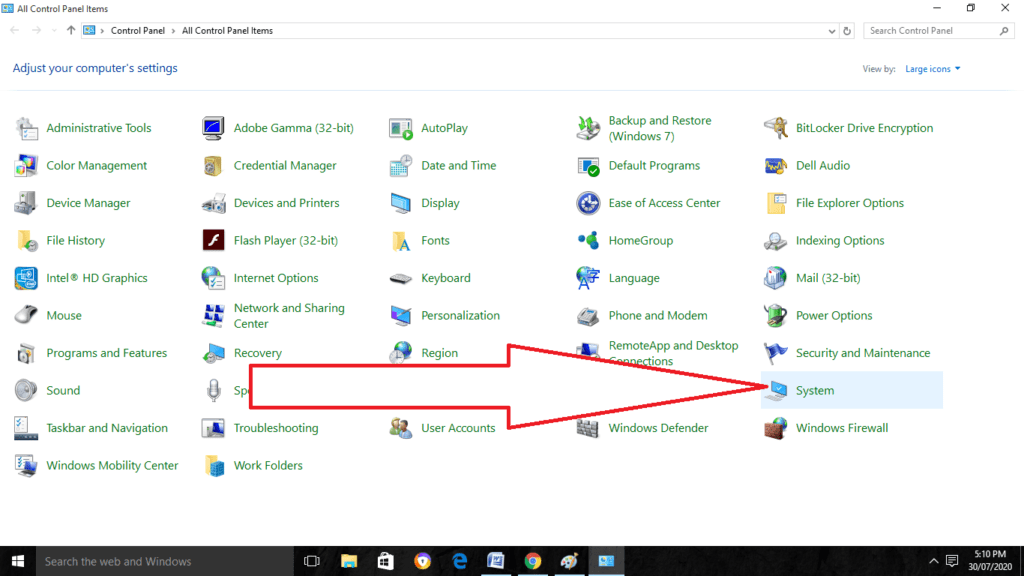
Step 2
When it opens the Control Panel on your screen, go for the selection of System option.
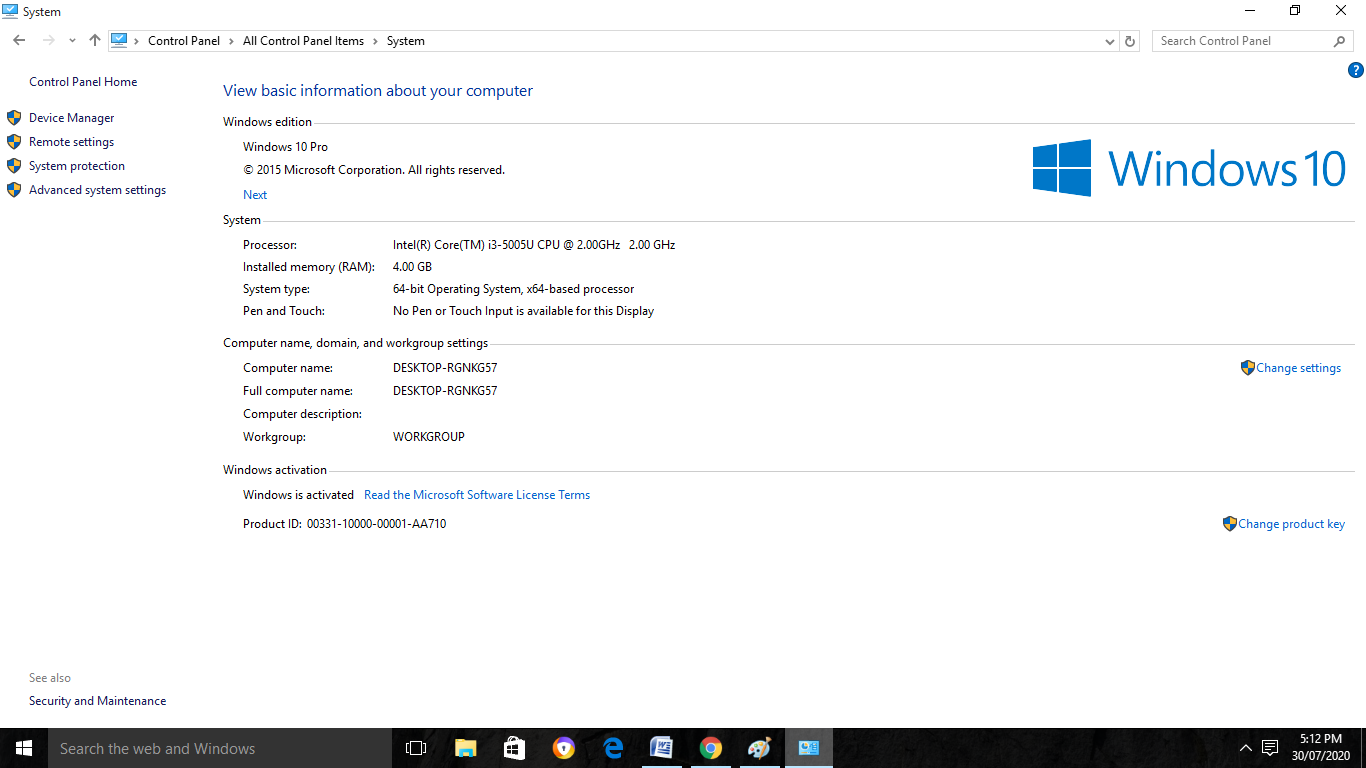
Step 3
In the window of System, you will get the Windows version there and the type of processor (CPU) that your computer includes in it.
Accessing Virtualization in the BIOS
As each PC has different kinds of versions of the BIOS screen and also the different settings of it. Along with this, the steps for the enabling of virtualization from the BIOS relies on the manufacturer of PC. The settings of BIOS can be performed by the use of F keys.
What is BIOS?
BIOS which stands for the basic input-output system is the small program that runs for the turning on of the computer. It is the basic function that helps the computer to boot up it to make sure that each of the systems is working in a proper way. Also, it controls the few advanced features on the computer. Few of them have the enabled form of it for working Enable Virtualization Windows 10.
For enabling virtualization, follow the given steps:-
Step 1
Firstly, Restart the computer and then enter there the setup of BIOS. It is performed by pressing the key just the same as the computer is switched on.
The key which you have to press to enter into the Windows Bios. As usual, it uses the F2, F10, F8, or the delete key. For example, Press the F8 key from the keyboard at the bootup screen to enter BIOS.
Most of the systems tell that which of the key is required for pressing for entering the setup or else you can consult with the manual of the computer Enable Virtualization Windows 10.
Step 2
As when you will enter the setup of BIOS, you will enable all of the settings of virtualization. The BIOS goes from system to system, which depends on the type of brand a person has.
Step 3
After the enabling of the various settings, do the saving of them and then exit the setup of BIOS. It is performed by pressing the F10 key. The computer will now restart.
Enable Hyper-V In Windows 10
For the managing of virtual machines, it is necessary to access the Hyper-V. You can perform this by the access of the Control Panel and the Windows PowerShell.
Control Panel
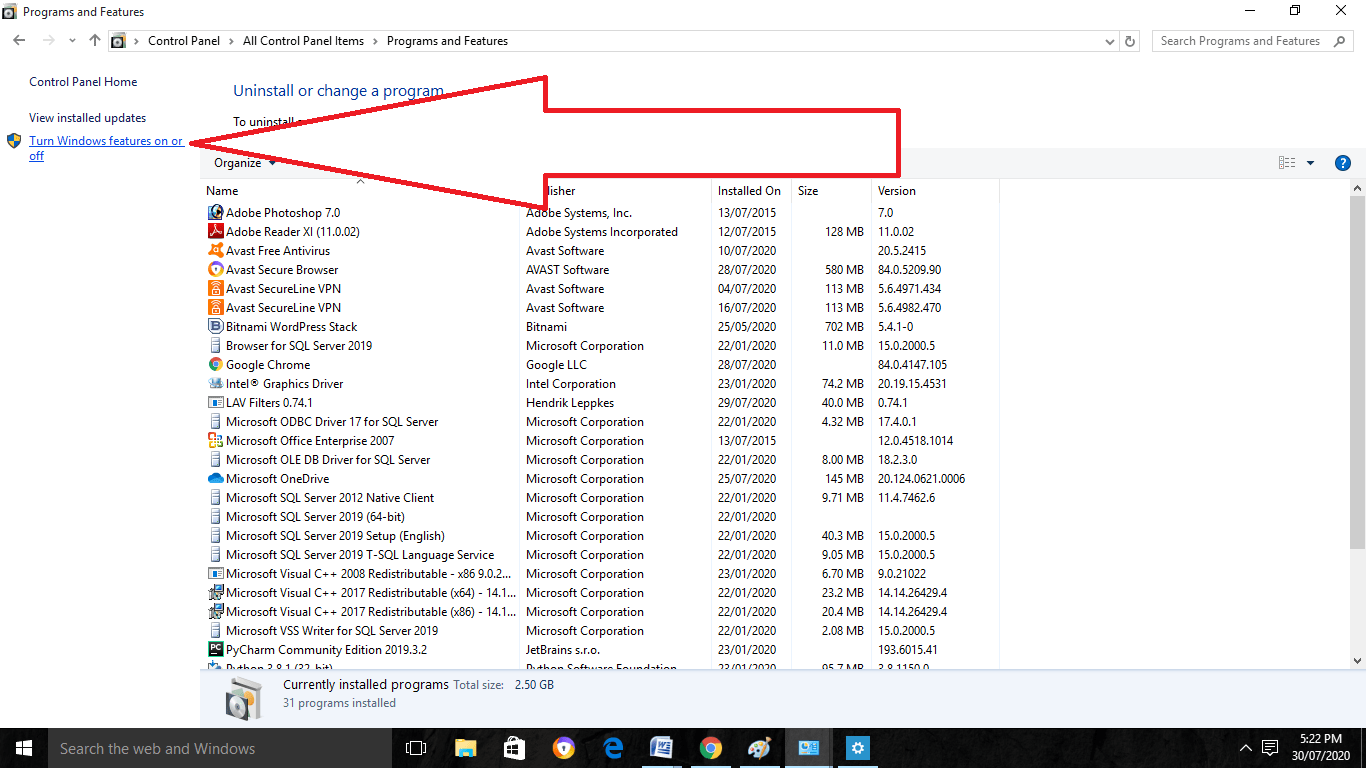
Step 1
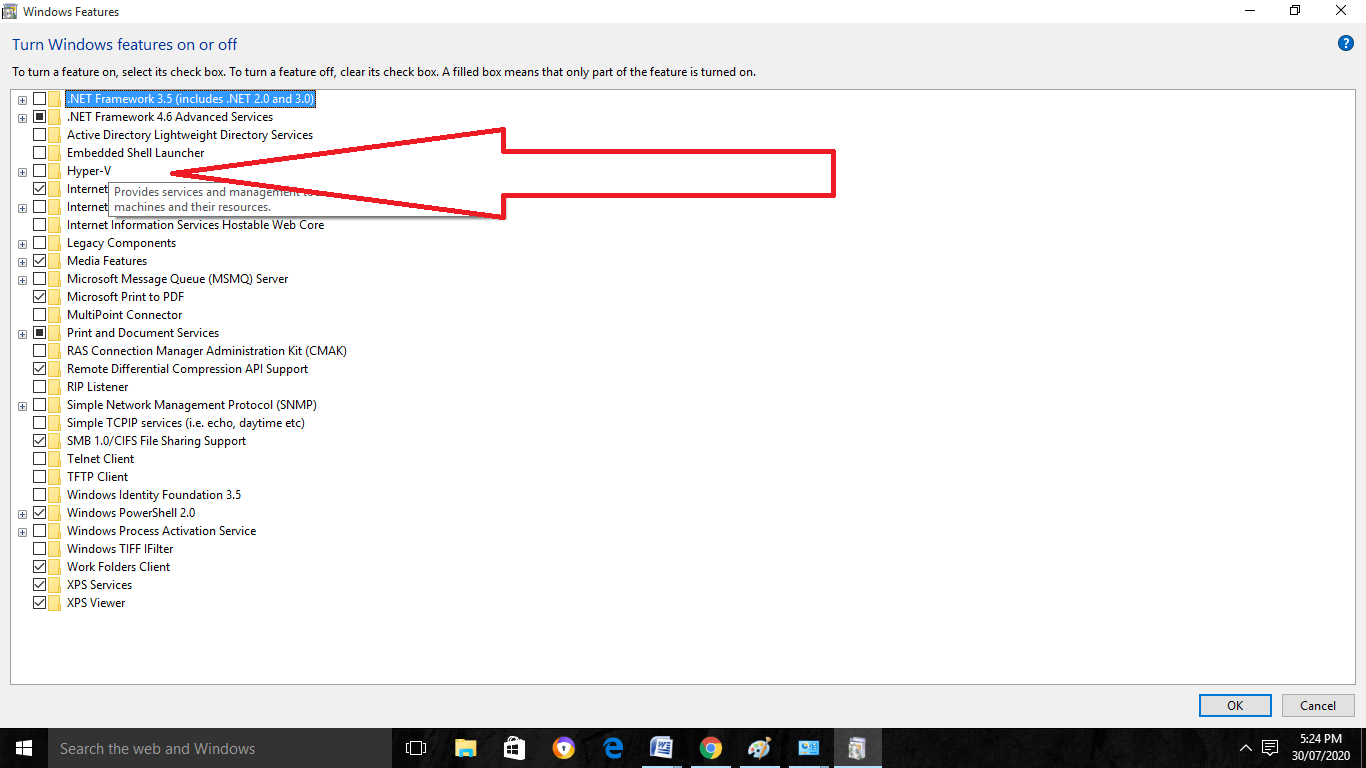
Firstly, open the Control Panel through the search bar from the Start menu. After that, go to the Programs and Features. Then Turn the Windows Features On or Off.
Step 2
Search there for the features of Hyper-V. Tick there all the subfolders under the Hyper-V and then click on the OK button. Then Windows will try foe the configuration of Hyper-V. It will ask for the restarting of the computer after the confirmation of all the changes.
PowerShell
Step 1
Begin with opening the Windows PowerShell from the search bar.
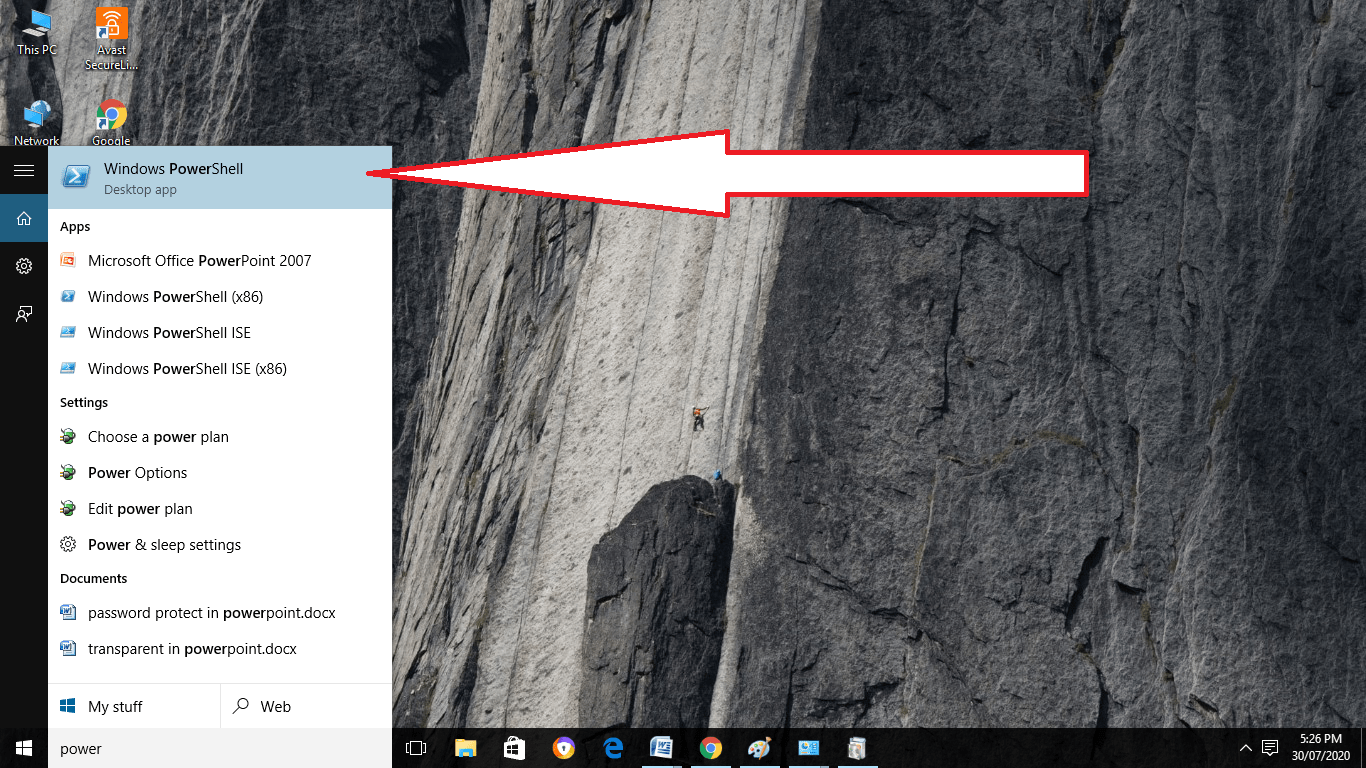
Step 2
Now type there the given line:-
Enable-WindowsOptionalFeature -Online -FeatureName Microsoft-Hyper-V -All
If the response comes from PowerShell and it tells that command cannot be found, then take a proper check that you are running it through the administrator. After that, restart the computer as it gets completed.
Creation of the Virtual Machine
As when ready, you have to start for the use of Hyper-V for the creation of virtual machines in Windows 10.
Here are the steps explained for setting up the Hyper-V:-
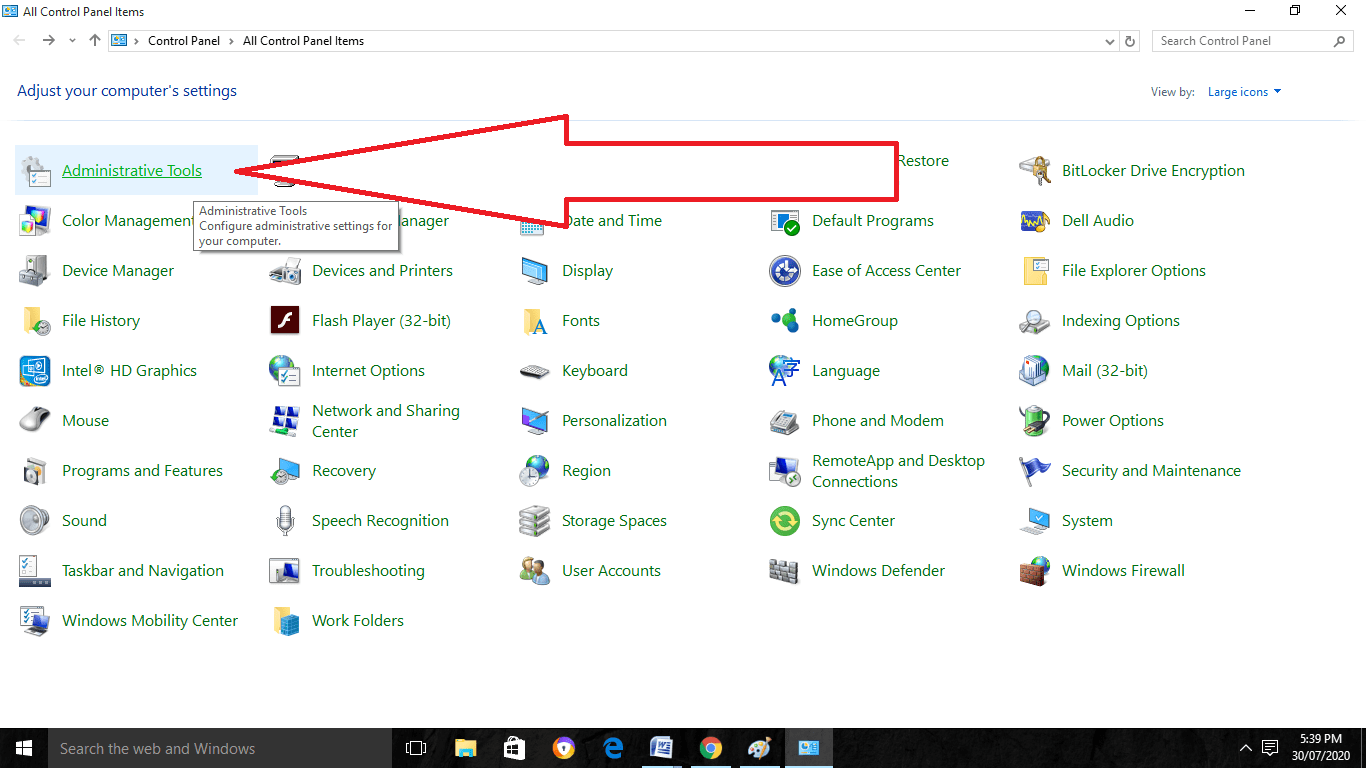
Step 1
Firstly, open the Control Panel through the search bar. Then go to the Administrative Tools and then double click on the Hyper -V for the launching of the application.
Step 2
On the given left-hand pane of the Hyper-V, do the selection of the name of the computer. You can also add the new virtual machine by visiting the Action and then clicking on New and then going to the Virtual Machine option.
Step 3
It will open the new window which is known as the New Virtual Machine Wizard. After the completion of the steps click on the Finish button after the creation of the new machine.
The new machines will appear under the Hyper -V.
Advantage of Windows Virtualization
Windows 8 was the only Windows version that supports hardware virtualization. Similarly, Windows 10 also gives support to it. This platform has gained most of the features from that time. It also includes the Enhanced session mode, USB redirection, Linux Secure Boot, and even many more.
Along with the Windows virtualization, people can do the testing of the apps that are inside a virtual machine without making the compromise with the main system. The new update of Windows 10 has the built-in feature which allows for performing that. It is known as the Windows Sandbox.
Virtualization also gives the allowance for the installation of a Linux shell on Windows. Other than the use of powerful Linux terminal and the commands you can also go for the use of Linux GUI.
Wrapping Things Up
Virtualization, therefore, is necessary for the Windows 10 to have there. Here we discussed the various headings on it along with the advantages of it. Go through with this topic and read our more.
Should I allow virtualization to run on my Windows 10 computer?
It is true that you should not activate VT unless you really use it; nonetheless, there is no additional danger regardless of whether or not the function is turned on. Whether or not you plan to use virtualization, it is imperative that you defend your system to the highest possible standard. There is nothing that can now be done that couldn’t be done before VT!
How can I activate virtualization in Windows 10 in a way that is permanent?
At the beginning of the BIOS Setup process, press the F2 key. After selecting Virtualization Technology using the arrow key on the right and then pressing the Enter key, you should exit the System Configuration tab. Choose Enabled, then hit the Enter key on your keyboard. To save your modifications and boot back into Windows, you need to use the F10 key, then choose Yes, and then click the Enter key.
How can I check to see whether the virtualization feature in Windows 10 is turned on?
Launching Task Manager and going to the “Performance” tab is the quickest and simplest method to determine whether or not you have Windows 10 or Windows 8 as your operating system. You should be able to view Virtualization, as shown in the image below. If it is activated, it indicates that the virtualization feature of your CPU is supported and is presently enabled in the BIOS.
Is it dangerous to run a virtual machine on a PC?
Deactivating hardware-assisted virtualization will not result in an increase in system security. Because it needs such a high level of rights to utilise in the first place, any malicious software that is capable of using it may already circumvent whatever limits that you have in place.
Related Articles:
- How Much is $1 in Robux? [Explained]
- 8 Ways to Fix Discord Screen Share Audio not Working
- How to View Passwords on Mac – Step by Step
- How to Install Bluetooth Driver in Windows 10
- How To Close Amazon Account – Step by Step Guide
- How To Share Google Map Location
- How to Turn on Google Assistant On Any Device
- How To Cancel NetFlix on iPhone – Step By Step
- How To Call Someone Without Showing Your Number