How to Insert Signature in Word (Step by Step)
This is a comprehensive guide based on how to insert signature in Word with complete step-by-step instructions.
Wondering how to add a signature to a word document well you feel better if I can tell you there are several ways to personalize your signature in Microsoft Word.
Most importantly, for the documents like letters, articles, or contracts along with other documents.
If you’re looking for a step by step instructions to insert a signature in a word then this is the end of your search.
Here in this short guide, we are going to explain to you how you can easily able to add a signature to a word document without having a hassle.
First of all for the readers who don’t know much about the digital signature.
What is Digital Signature? Why is it important
Basically, we all know what a signature is a traditional physical signature is one that is placed at the bottom of a contract.
When someone puts their name on a paper, it signifies they agree with everything on it. A digital signature verifies that the person who signed the communication or document authorizes it.
How To Insert Signature in Word Document
There are two types of signatures that you can add to the Word document.
- Signature Line
- Digital Signature
Insert Signature Line in Word
The signature line enables you or anybody else with a proper location to sign a printed document.
In case you’re thinking to print your word document well then inserting a signature line is one of the easy methods for you to insert a signature.
Follow the below given step-by-step instructions to understand the entire process of adding a signature line to the word document.
- First of all open Microsoft Word from the Start menu.
- Now, navigate to the Insert > Signature Line.
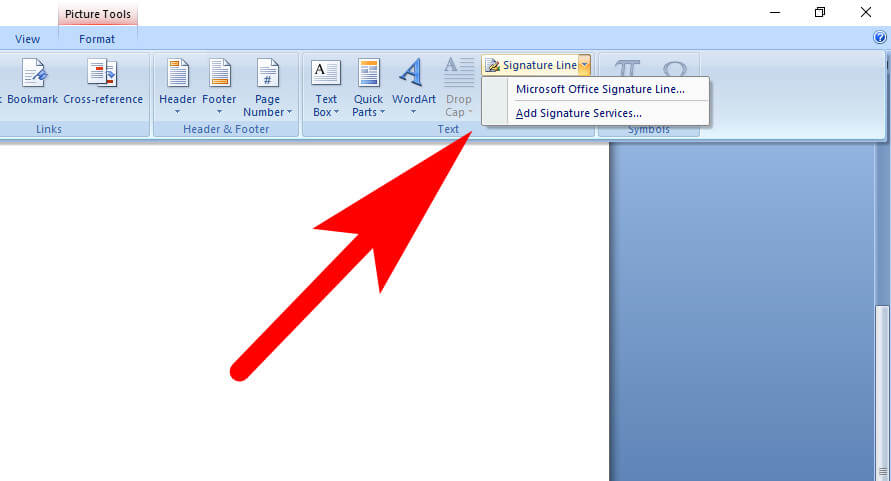
The signature setup window will pop on your screen. In which you needed to fill out the signature details. Such as name, email address, and a title well this can be you or somebody else.
Moreover, you can also add instructions to the signer and once you fill out the details hit the “ok” button to add the signature to the word document. Once you confirm the signature options the signature line will be added with the cross and the line that shows where to sign.
After this, you can place the signature into appreciate position in the word document. Well, the document can be easily signed in the right position after printing it.
If you want you can also add a digital signature to a word document before printing it.
Insert Digital Signature in Word Document
You can also add an electronic signature in a word document that represents your company or your business and yourself.
Well, using a digital signature is also a secure way to protect yourself from the hacker who tries to steal your signature. Adding an electronic signature to a word is similar to adding a line signature that we have explained above.
To better understand the process of adding the digital signature in word follow the below-given steps properly.
Step 1:
First of all, Sign your Signature on the blank paper. After this use the Scanner App from your phone to scan that signature that you recently signed.
Now upload the signature to your computer in JPG, GIF, or PNG file format only.

Step 2:
Go to Microsoft Word and navigate to the Insert section from the menu bar available at the top of the screen.

Step 3:
Select the “Pictures” to open a new window tab in MS Word. After this go to the location where you uploaded the scanned signature into your computer and select it and hit the open button.
Step 4:

In case the signature appears too large, then you needed to edit it for this click on the “Picture Tools” section and select the “Format” and then.
Choose the “Crop” option to resize the signature image. You can also enter height and width manually in the small dialogue box given on the right side of the screen.
If you wanted to add additional information to the signature such as Domain name, Address or contact number you’ll have to use the “Quick Parts” feature here are the steps for it.
1. Firstly, write your email address, job title, and phone number under the signature picture.
2. Now use the cursor to highlight both the pictures along with additional information.
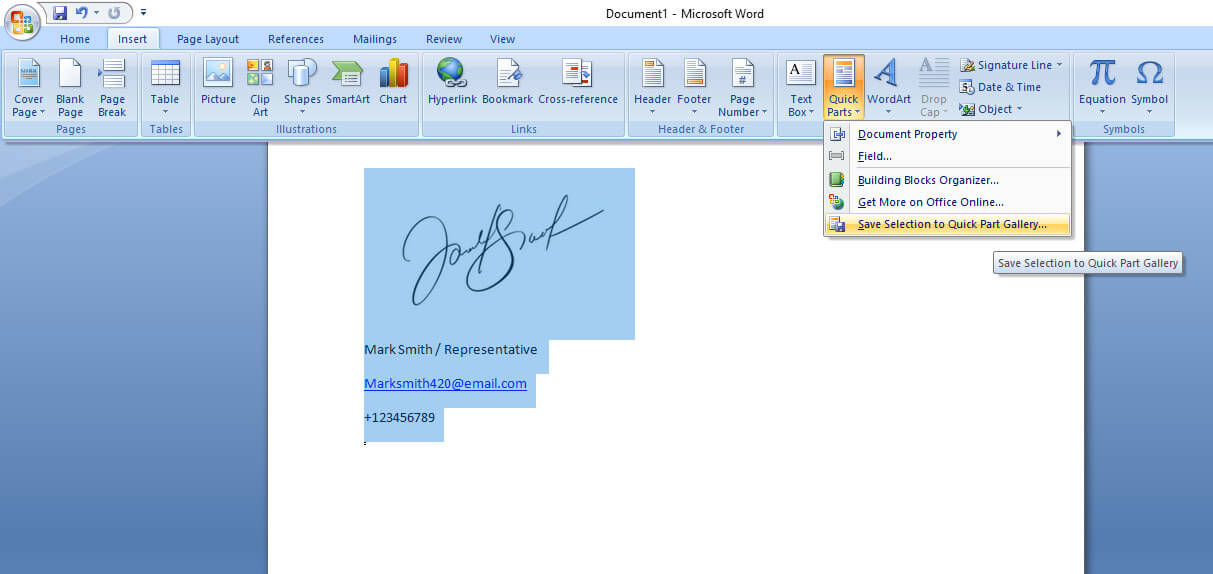
3. Go to the Insert section and click on the Quick Parts tab
4. Choose the “Save Selection to Quick Part Gallery” option to a new window tab.
5. After this in the Word section fill out your Name.

6. Now check if the Gallery is selected as “Auto Text” if not then select it.
7. Finish the process by tapping on the “OK” button.
8. Now the signature is ready to get place the cursor where you wanted to insert it.
9. Navigate to the Insert > Quick Parts > Auto Text.
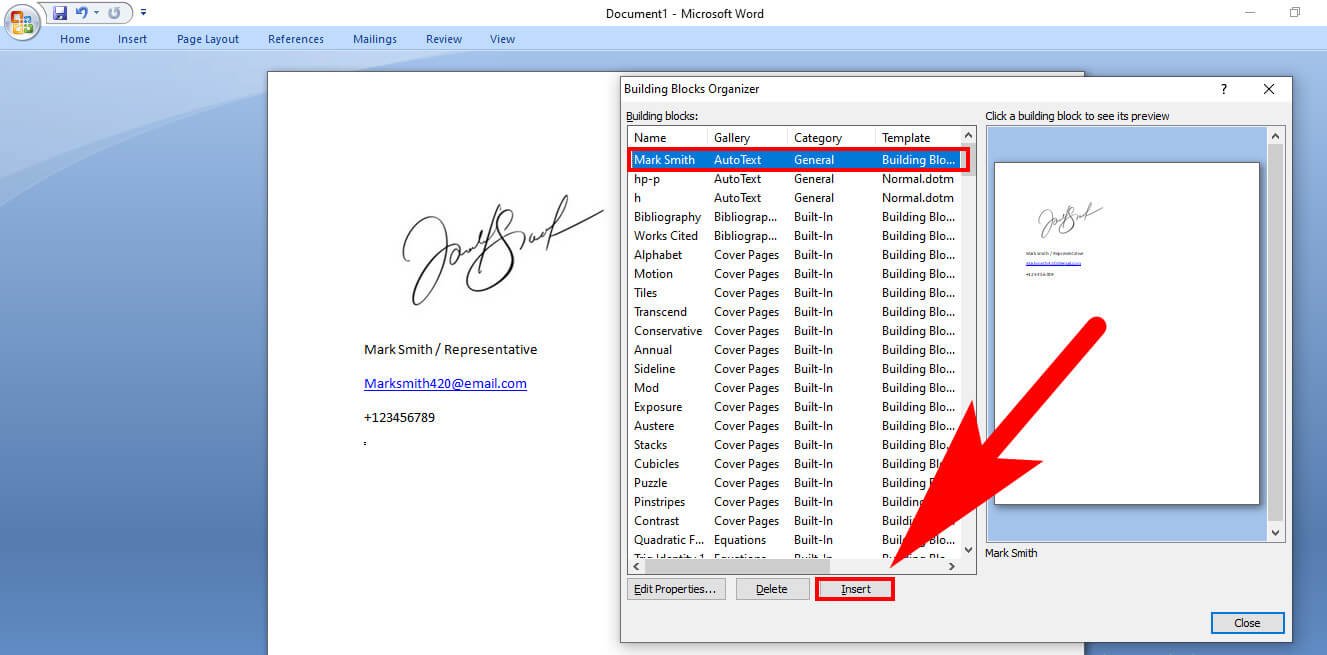
10. Choose the signature from the list of blocks.
After following the above steps you can understand how you can insert a digital signature in a Microsoft word document. Well, let’s discuss more this such as what is the process to remove the signature in word.
How To Remove Signature in Word Document
If you received an important word document with a digital signature on it and you wanted to forward that document to someone without any signature on it.
Well, you can also do that for this you needed to remove the signature on the word document.
Follow the below step-by-step instructions carefully to understand the process of removing a digital signature from a word document without having a hassle.
Go to Microsoft Word and load the document that contains the signature using the navigation bar.
After this go to the signature and place the cursor on it and right-click on it.
The menu list will appear on the signature from it select “Remove Signature” and confirm with yes.
FAQ: Frequently Asked Questions
These are some commonly asked questions regarding the digital signature in words with a complete explanation.
How do you create an electronic signature in MS Word?
You can use Microsoft Word to create a digital signature template for your email address. Well, you can also insert additional information such as domain name, address, contact number, job title etc.
Go to MS Word and navigate to the Insert section and select Text > Signature Line.
After this fallout, the signer information and hit the OK button.
Select the signature line in the word document. Go to the Insert > Picture and select the contain the signature.
Copy the signature template to your business email address.
Moreover, if you want to customize your signature or want some more options for the email signature templates then you can get them from the Microsoft website on your computer.
How Can I Create Digital Signature?
On the web, there are multiple web applications and add-ons that allow you to make a digital signature from which you can easily able to create electronic signatures.
For example, you use the DocuSign app which is also compatible with Microsoft apps including Word. These are the steps that you need to follow to create a signature using DocuSign.
Copy the URL of the word document in which you needed to insert the signature.
Now, go to DocuSign and select a load that document in the application.
After this agree to the terms and conditions.
Follow the on-screen instructions to create your digital signature.
FAQ: Frequently Asked Questions
These are some of the frequently asked questions related to the How to Insert Signature in Word with complete information.
How do I insert a handwritten signature into a Word document?
To add your signature, right-click the signature line and select Sign. Type your name in the area provided in the Sign dialog box that displays, or choose an image of your handwritten signature if you like.
Can I handwrite a signature in Word?
On both Windows and Mac, you may add a handwritten signature to a document created in Microsoft Word. This is useful for sending letters, creative works, and even legal documents via email.
How to sign a Word document without printing
In order to sign a word document without printing in MS Word, you need to follow these steps. Then select the Toolbox symbol, followed by the Signature icon. Then, under Create Signature, click Here to Begin. At the top of the box, select the Trackpad tab. You can also take a picture of a signature with the Camera tab, however, this is a less exact alternative.
How do I write my signature on a Word document?
In order to insert or input your signature on MS Word, you need to follow these steps.
1. Place the cursor where you want the line to appear.
2. Select Signature Line from the Insert menu.
3. Select Microsoft Office Signature Line from the drop-down menu.
4. You can type a name in the Suggested signerbox in the Signature Setup field. In the Suggested signer’s title box, you can additionally add a title.
5. Click the OK button. In your document, there is a signature line.
Final Words
Alright! This is the end of this short guide, Hopefully, we try our best to explain how you can add signature in word along with other relevant topics.
Moreover, if you’ve any queries related to this guide or the digital signature feel free to ask us via the comment box.
We try our best to resolve your issue as ASP with our tech expert team. Don’t forget to share your opinions for this guide to keep us motivated.
Related Articles :
Ways To Combine Word Documents In MS Word
How to Change Default Font in Word
4 Ways on How to Insert a Line in Word
7 Free 3D Modeling Software For Woodworking
(10+) Battle Royale Games Like PUBG Mobile For Android
10 Best Video Games To Learn English While Playing
How To Rotate the Screen on iPhone 7
How Long Does it Take To Go To The Moon [Explained]
How to Close Apps in iPhone 11 – Complete Guide
How To Turn Off Pop-up Blocker – Step by Step Guide
Turn ON Flashlight On Your Phone – Step by Step Guide
How to Turn off Flashlight on iPhone 10