
optimize windows 10 for gaming: Gaming on Windows 10, is way to better compare to Windows 8, 7, or even vista. Because Windows 10 has updated and advanced features for gaming which highly compatible with system preferences of your personal computer. All most all pro gamers prefer Windows 10 OS when it comes tooptimize windows 10 for gaming.
When it comes to gaming in Windows 10 the OS supports lots of gaming features such as mixing native games, support for retro titles, and yet Xbox One streaming. However, it is not perfect for gaming like it seems there are some gaming optimization tweaks you can use to improve gaming performance on Windows 10 optimize windows 10 for gaming.
10 Ways To Optimize Windows 10 For Gaming
There various ways to optimize windows 10 for gaming purposes to improve fps, gaming acceleration, reduce gaming lag to enjoy the best gaming experience on Windows 10.
1. Use Gaming Mode In Windows 10
Microsoft Windows 10 latest version has a build-feature called Game Mode. The gamers can easily optimize Windows 10 for gaming using the game mode to improve fps performance while gaming. To do so, follow these guides.
Follow these steps to enable Game Mode on Windows 10.
1. Press Windows Key + I using the keyboard to open Windows 10 Settings.
2. Now, type “Game Mode” on the search bar.

3. Select the “Game Mode Settings” or “Turn on Game Mode” both options are the same.
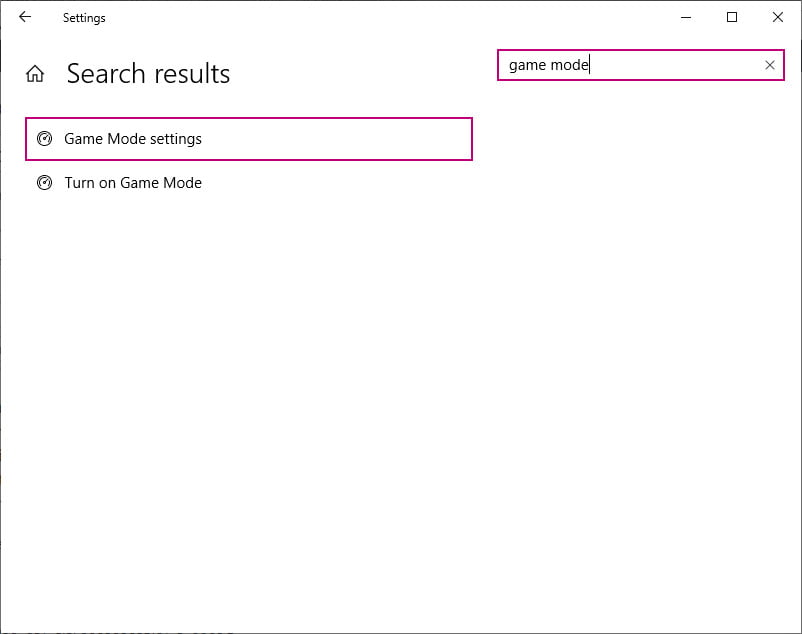
4. Click on the “turn on” button given under the Game Mode section.

Note:
If you’re Windows 10 PC does not show Game Mode in Settings then it means you’re not using the latest version of Windows 10.
Well, if you’re computer supports Game Mode, you can enjoy gaming resources like an optimum frame rate can easily manage and achieve.
After enabling the Gaming Mode on Windows 10, you can experience improvement on gaming performance such FPS will be boosted.
2. Disable Nagle’s Algorithm
Nagle’s Algorithm comes handy to enhance the effectiveness of TCP/IP networks by lessening the number of packets that require to be sent over the network. Basically, the bundle’s data packets at the cost of a blander internet connection.
So, to experience better gaming performance in Windows 10, you can disable or turn off nagales algorithm using below given steps.
1. Press and Hold Windows + R keys on your keyboard to open the Windows Run dialog box.
2. Type, “Regedit” into the Run box, and hit the enter button.
3. Now, In the Registry Editor navigate to the following,
Just copy and paste this address on the registry editor search bar as shown in the given screenshot.
HKEY_LOCAL_MACHINE\SYSTEM\CurrentControlSet\Services\Tcpip\Parameters\InterfacesOn the left side panel, you will able to see lots of folders containing numbers and compressed letters. Well, to get the correct file you must match your IP address to the registered DhcpIPAddress in one of those folders.
Note:
If you don’t know how to check your system IP address then follows, Open Network and Sharing Center > Connections > Details.
After finding the correct match folder.
4. Right-Click on the Folder, then select “New > DWORD (32-bit) Value“.
5. Enter the name “TcpAckFrequency” and hit “OK” button.
6. Pick New > DWORD (32-bit) Value, again.
7. Name this, “TCPNoDelay“
8. Then double-click each of them and adjust their value to 1.
By following all these 8 steps you can disable Nagle’s Algorithm. In case if you want to revert the process and change the values of both to “0”.
3. Install DirectX 12 To Windows 10
DirectX is an important app for the Windows users who wanted to play games on Windows 10. Technically, it enables Windows users to communicate with the computer and guide it on what to do. So basically, in order to enhance your gaming experience on Windows 10 you must install DirectX 12.
In case, if you don’t know if you’ve already installed DirectX 12 into your Windows 10 PC. Then don’t worry here are some steps to find out. If your PC already has DirectX 12 or not.
1. Press Windows Key + R to open the Run dialog box.
2. In the Run dialog box, type “dxdiag ” and hit the enter button.
3. If your computer already has DirectX installed then it will be opened as shown in the screenshot.
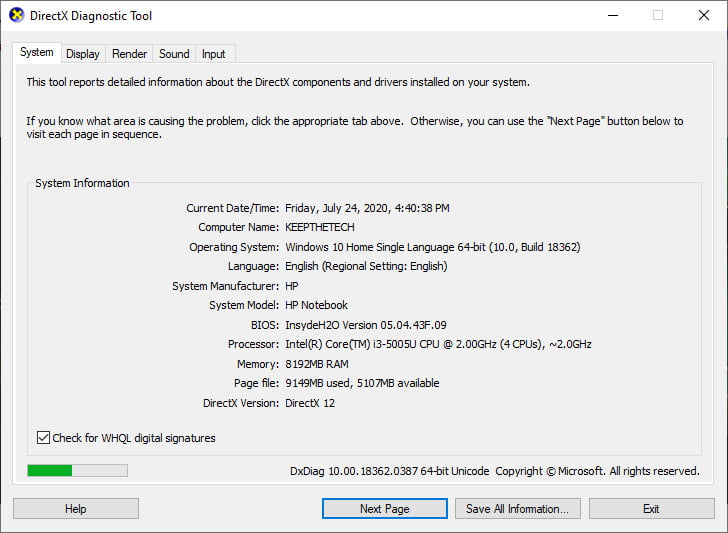
However, after entering the command line on the Run box. You cannot able to see any pop-up window then, Firstly download the DirectX 12 from Microsoft and install it to improve the gaming performance.
4. Get Faster DNS For Online Gaming
If you most play multiplayer games on Windows 10 or use gaming apps for windows like Xbox Console Companion for replaying on the remote server for gaming, In this network traffic may cause an issue for this you must optimize Windows 10 for online gaming by using faster DNS (Domin Name System).
Moreover, While upgrading to faster DNS can also make some network tweaks,
1. Press Windows Key + I, to open Settings.
2. Now, Find Network and Internet > Change Adapter Options.
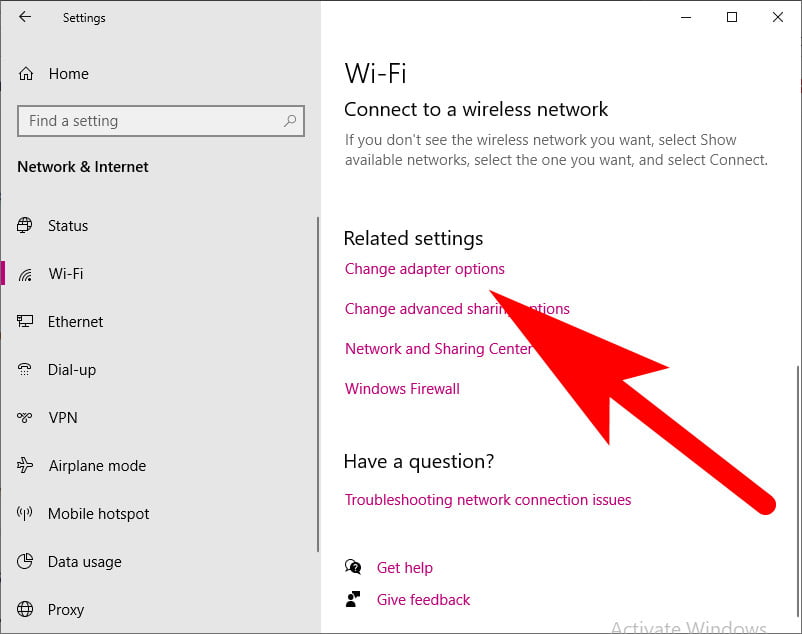
3. After this, Right-Click on your WiFi Network, then select “Properties”.
4. Highlight, Internet Protocol Version 4.
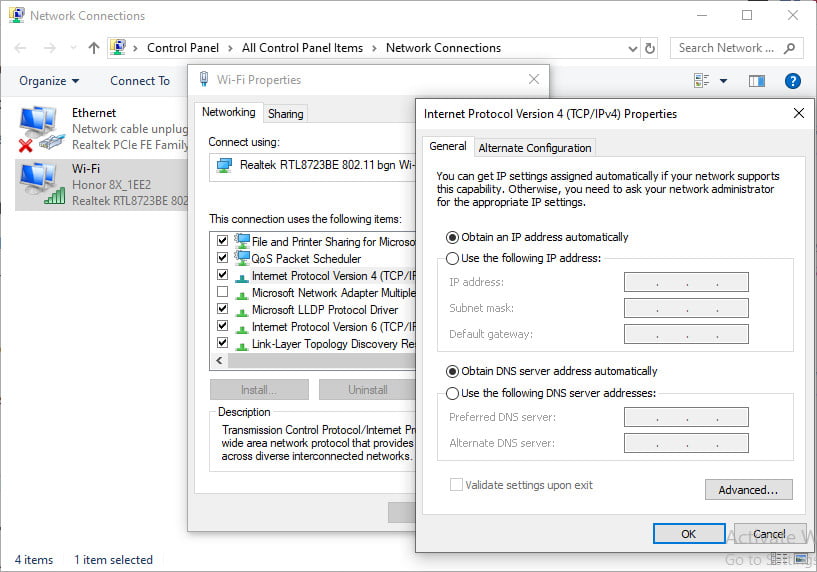
5. Compose a record of two DNS entries for future implications.
6. Replace the values with 1.1.1.1 and 1.0.0.1.
7. Hit the “Ok” button to save the changes.
5. Enable High-Performance Power Plan
Switching the power plan may help Windows 10 users to get a better gaming experience. Since the power plan on Windows PC is originated to manage battery usage on portable devices such as laptops. So if you’re Windows 10 on a laptop, this method can help you to optimize Windows 10 for gaming.
Most of the Windows 10 users have a balanced power plan set as default, but you can change it to the high performance for enhancing gaming.
Here the steps to enable a High-Performance power plan on Windows.
1. Open the Windows Settings by press “Windows + I” keys.
2. Go to the “System” from the settings window.
3. Navigate to the “Power & Sleep” tab, then click on “Additional Power Settings”.
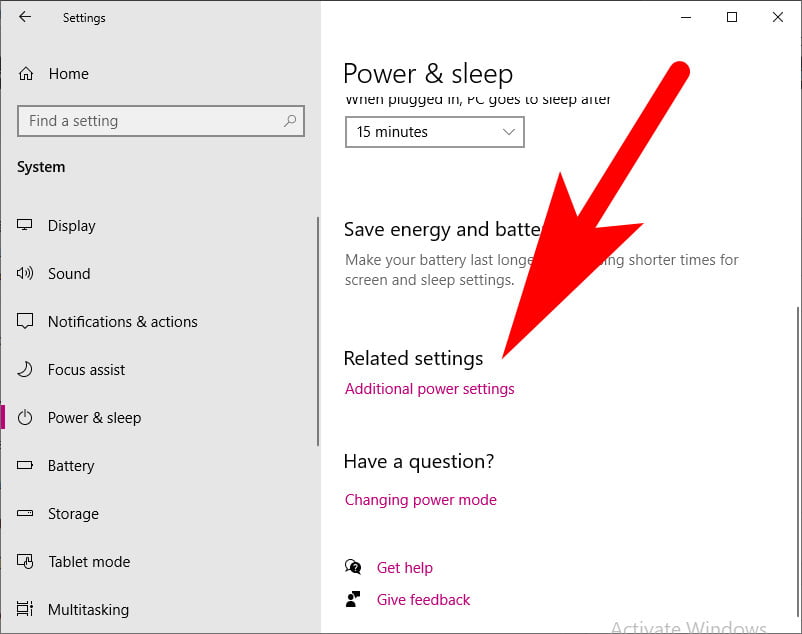
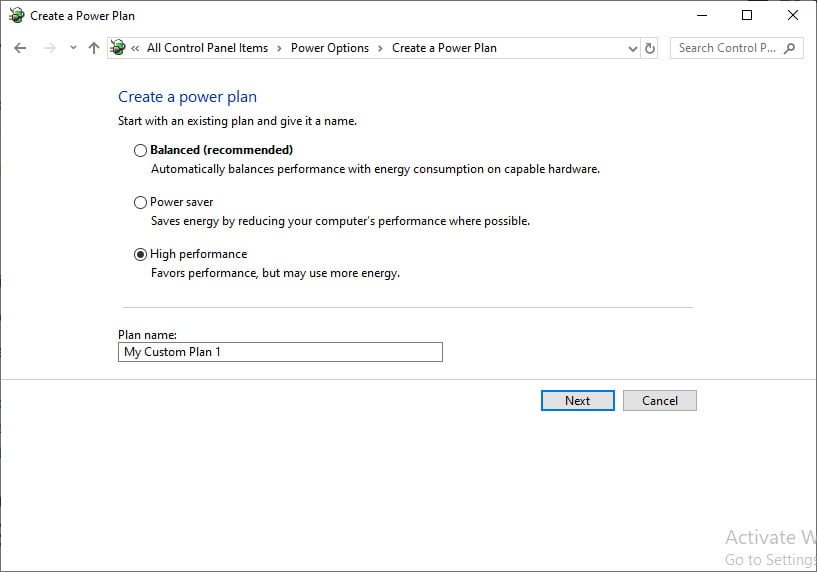
4. In the Power Options window, check “High Performance”.
6. Disable Auto Updates on Windows 10
Windows 10 updates may cause an issue while gaming because Windows 10 will automatically update the OS and schedule the restart without the permission. This can happen while you playing the game on your PC and it may cause loss of the save game.
Also, the auto-updates on Windows 10 will download updates of apps in the background that will limit internet connectivity.
You cannot disable the Windows restart after the updates completed. But you can easily delay it. To reduce the chance of Windows getting restarted and downloading updates while gaming.
1. Open the Windows Settings from Start Menu.
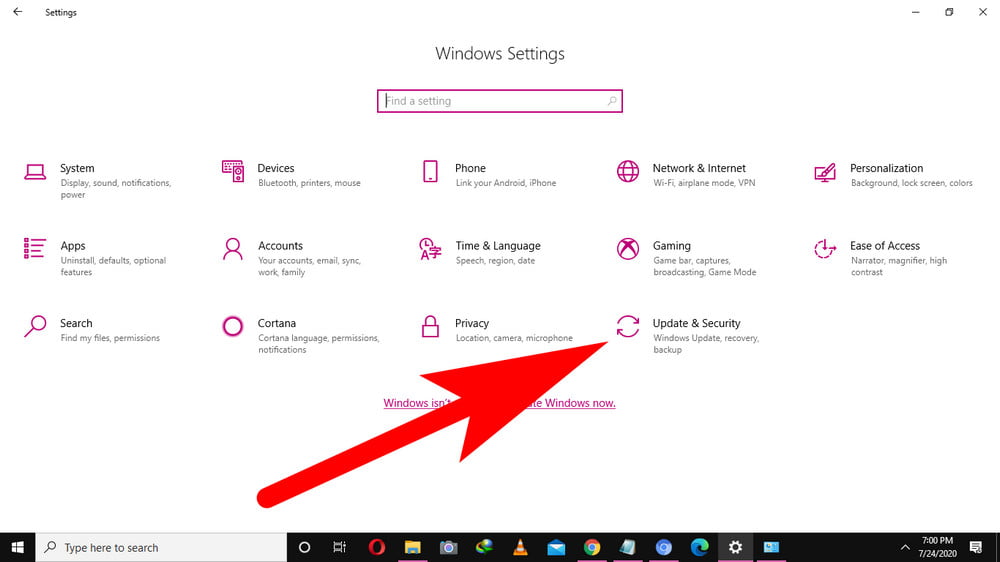
2. Click on the “Updates & Security”, then “Windows Update”.
3. Go to the Advanced options > Update Options.
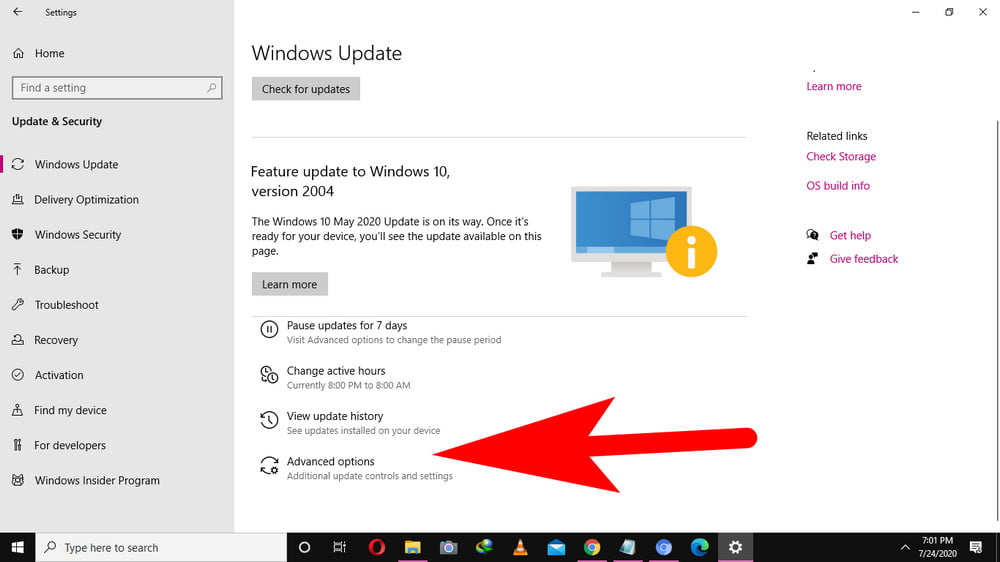
4. Disable Restart this device as soon as possible when a restart is required to install an update
5. Enable the “Shows Notification” (After this you can several notifications your PC going to restart).
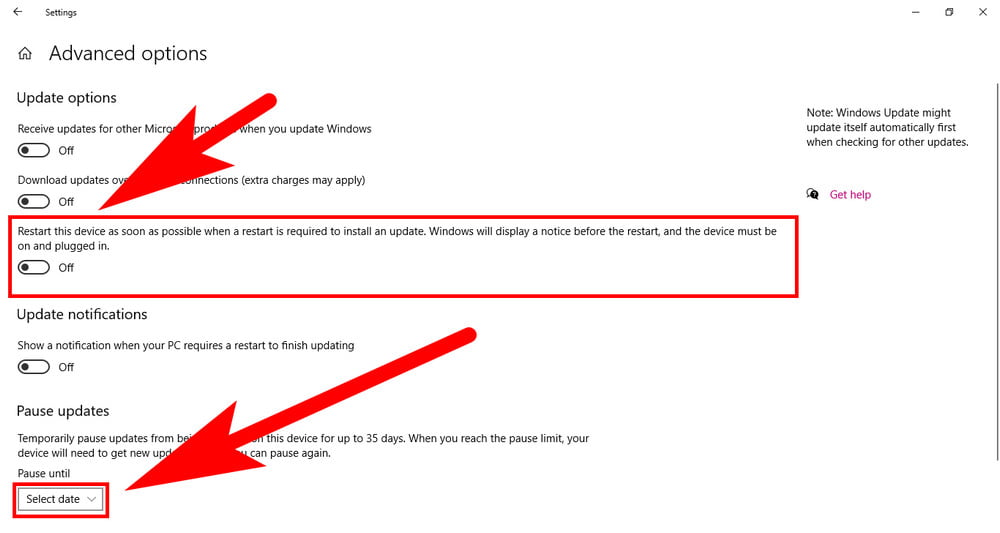
6. Also, enable Pause updates ( suspension installation of updates for up to 35 days)
7. Update GPU Driver on Windows
We all know GPU (Graphics Processing Unit) is the core of the gaming any device that supports gaming. Basically, the GPU helps the device to provide a PC gaming experience along with performance. Technically, the system needs to have the latest version of GPU driver installed on Windows PC.
To improve and optimize Windows 10 for gaming, you must update the GPU driver, here how you can.
1. Press the Windows key + R together to open the Run dialog box.
2. Now, in the Run box. Type “msc ” and press the OK button.
3. In the Device Manager window, navigate to the Display Adaptor and choose the driver of your PC.
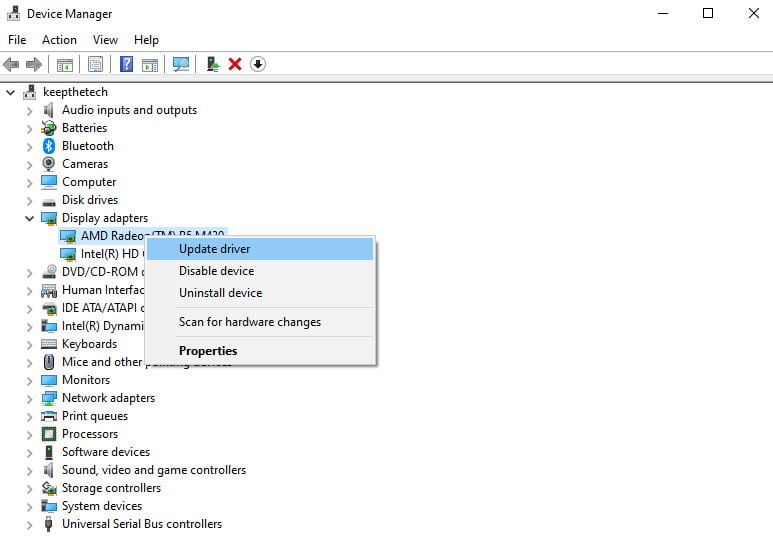
4. Right-Click on the driver to open pop-menu and select “Update”.
5. Then, select “Search automatically for updated driver software”.
If the updates version of GPU driver available for your Windows 10 PC, then it will be downloaded and install automatically. After that, check whether you get smoother gaming experience or not.
8. Use Visual Effects In Windows 10 for Game Enchantment
The GUI (graphical user interfaces) can be an impediment to the processing power of the system. As default in Windows 10 which is basically used to customize the appearance of the Windows. Moreover, several background graphics are enabled that affect the processing of the computer. When you play the game on Windows 10 to optimize windows 10 for gaming.
Well, on this how to optimize Windows 10 for gaming, you can tweak your Visual Effects Settings.
1. Open the Windows Settings. By Start Menu or Press Windows + I keys to optimize windows 10 for gaming.
2. In the Settings window, Type “Performance”.
3. Choose “Adjust the appearance and performance of Windows“
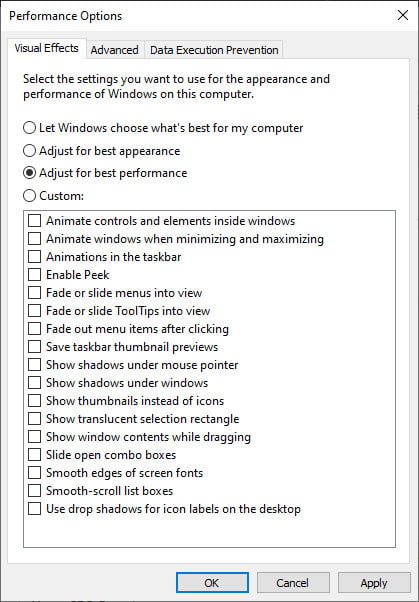
4. In the Performance Options window, select “Adjust for best performance” then click Apply.
5. Now, switch to Advanced tab, then check to Adjust the best performance of is set to Programs.

6. Click on the Apply button again, then Ok.
9. Enhance Pointer Precision For Mouse Acceleration
You can easily disable mouse acceleration on Windows 10 to optimize it for the gaming. If the mouse acceleration is disabled in Windows, then you can see improvement in the gaming performance to optimize windows 10 for gaming.
In order to optimize Windows 10 PC for the gaming, disable mouse acceleration.
1. Open the Windows Settings.
2. Go to the Devices > Mouse. Then switch to the Pointer Options tab.
3. Then, Uncheck the “Enhance Pointer Precision”.
4. Hit “Apply” then “Ok” button to save changes.
When you disable the acceleration of the mouse in Windows you can get a better gaming experience to optimize windows 10 for gaming.
10. Disable Steam Auto-Updates For Games
If you’re using Windows PC or laptop for playing games, Then probably you’re buying and installing games via Steam. One of the largest perturbations with the Steam is its update features. Which blocks you to stop auto-updates all the games you access on Windows. This may also cover the space or memory by updating the games and also limit your internet connectivity to optimize windows 10 for gaming.
Well, you can disable the stream in way to optimize Windows 10 for gaming,
1. Open the Steam app from the Start Menu.
2. Go to the Steam Settings > Downloads.
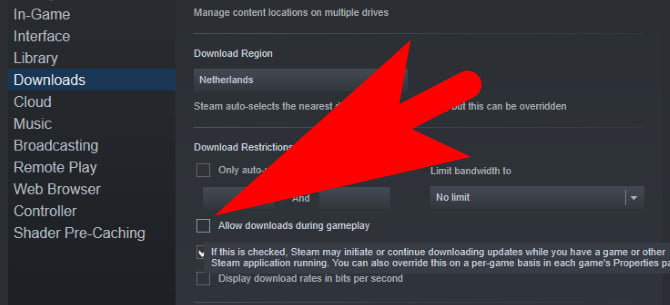
3. Uncheck the “Allow downloads during gameplay” option.
Final Words
These are all the 10 ways or tweaks to optimize Windows 10 PC for gaming.
1. Use Gaming Mode In Windows 10
2. Disable Nagle’s Algorithm
3. Install DirectX 12 To Windows 10
4. Get Faster DNS For Online Gaming
5. Enable High-Performance Power Plan
6. Disable Auto Updates on Windows 10
7. Update GPU Driver on Windows
8. Use Visual Effects In Windows 10 for Game Enchantment
9. Enhance Pointer Precision For Mouse Acceleration
10. Disable Steam Auto-Updates For Games
With these methods, you can improve your Windows 10 Gaming to the next level. In case we have missed any point or method which can optimize windows 10 for gaming and should be in this list. Feel free to tell using the comment box. Happy Gaming!
Why is my gaming PC lagging?
The presence of other applications working in the background is one of the most typical factors contributing to latency. These apps may eat up system resources, making it more difficult for your game to function smoothly and perhaps even rendering it unplayable.
Which version of Windows 10 is ideal for playing games?
The version of Windows 10 known as Windows 10 Home is the one that is ideal for playing video games and is the one that the vast majority of gamers will choose.
Is it possible that RAM might improve FPS?
Because RAM is responsible for storing information for just a brief period of time, having more RAM will assist in the production of more frames per second.
Is Windows 10’s built-in gaming mode any good?
Game Mode is a mainly helpful feature that can and does enhance performance; nevertheless, some users have complained that issues only occurred when Game Mode was active. This is despite the fact that Game Mode is a function that may increase performance.
Related Articles:
- How Much is $1 in Robux? [Explained]
- 8 Ways to Fix Discord Screen Share Audio not Working
- How to View Passwords on Mac – Step by Step
- How to Install Bluetooth Driver in Windows 10
- How To Close Amazon Account – Step by Step Guide
- How To Share Google Map Location
- How to Turn on Google Assistant On Any Device
- How To Cancel NetFlix on iPhone – Step By Step
- How To Call Someone Without Showing Your Number