If you are using an Nvidia GPU then you know that for using this you have to go to the Control Panel at least once or twice.
And if you are a gamer then you use it daily. Besides, if you started using this particular NVIDIA application, then you are aware of how slow and awkward the software has always been.
But, you have luckily a piece of freeware out there called NVIDIA Inspector. It can do everything better. Along with this, it provides a variety of unique and useful features.
Here we are going to know how the NVIDIA Inspector can come to your rescue.
What is an NVIDIA Inspector?
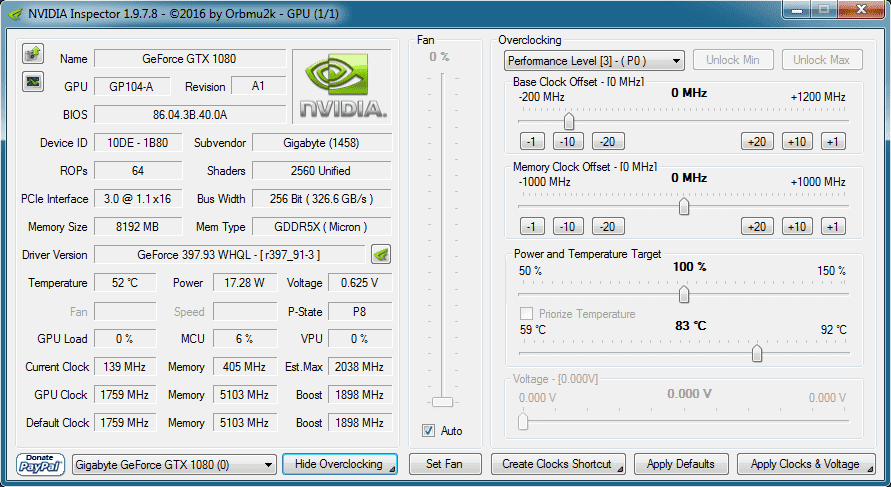
NVIDIA Inspector is a free and lightweight program which is developed by Orbmu2k. It can read out driver and hardware information related to graphics cards or GPUs.
When you open a simple executable file of this application then you do not require an installation. You will be brought to the NVIDIA Inspector’s main window.
Here most of its functionality is located.

When you click on the button you will see a whole host of information about your graphics card. And if you have them, it is easy to check your overclocks.
As well as, you can confirm what driver version you’re running. Or you will be able to access an overview of what’s going on under the hood of your card at a moment’s notice.
Whereas, if you click on the green icon which appears next to the Driver Version field. Then it will open a new window which is the NVIDIA Profile Inspector.
Here you can change all of your global GPU graphics settings. Along with this, you can change GPU settings on a per-application basis.
In the NVIDIA Control Panel, the core function is to tweak your GPU’s settings. Apart from adjusting your monitor’s colour and display settings which can be done from within Windows. As well as, the NVIDIA Inspector is much better and easy at doing this than the Control Panel.
Because NVIDIA can not only load much quicker and save settings faster. But also it has many settings available within it that you can use to improve performance.
How to Use NVIDIA Inspector
You can allow changing your graphics card’s global settings in the NVIDIA Profile Inspector window. But it seems unintuitive at first when you use it.
There are many settings within it that will take effect in all your games. Like, certain game has their own profile with different settings on them.
The setting is not grayed out here and with a gear next to them you will find a core set on the left side of the window. You can change the setting within the NVIDIA Control Panel itself. If you want to change the setting you can simply click on setting.
Then you will find a drop-down arrow that will appear on the right side of the setting. It is near the list of codes on the right-most side of the window. If you click on this arrow then it will display all the available options for an individual setting.

If you want to save your setting then click on the apply option which will appear in the top-right corner of the window.
You can follow the same process for customizing the profiles of individual applications. When the Profile Inspector window is opened by default, then you will be able to access your graphics card’s global settings.
If you click on the drop-down arrow which appears next to the field at the top of the window. Then, you can select whichever game or application you’d like.
By this you can change individual graphics settings and if you want to change the global setting change them in the same way.
You will find more options in the settings of NVIDIA Inspector than the same settings do in the NVIDIA Control Panel. For example, you will see in the NVIDIA Control Panel, that you are able to set vertical sync to half your refresh rate.
But with the help of the NVIDIA Inspector, a third or a quarter of your refresh rate is also possible. Nivida inspector has more options. It depends on what settings you’re interested in tweaking.
The NVIDIA Control Panel is a core piece of NVIDIA’s utilities and you have no way to get rid of it. You will find several settings outside of your graphic card that the control panel can adjust.
Whereas, NVIDIA Inspector not only provides you access to a boatload of useful information about your GPU. But, it is also one of the best and easiest ways to change your GPU’s settings.
NVIDIA Control Panel vs NVIDIA Inspector
If the NVIDIA control panel is not preinstalled on your computer and you want to download it. Then you can download it from Microsoft Store. NVIDIA Inspector is a free app.
And it is available on Throttle Stop’s website. The bundle comes with an open-source app which is named NVIDIA profile inspector. But don’t need to launch it separately.

Moreover, the NVIDIA Control Panel is laggy and you will find it quite slow while using it. It has a dated UI. On the other hand, The NVIDIA Inspector is light in weight.
And, You don’t need to install it. You have to only double click on the executable file then it will simply launch/run. You don’t find any lags and a small footprint.
You have to notice on your graphics card it is lacking in the NVIDIA Control Panel for some reason. Everyone is not focusing on these details about the card.
So they often come in handy. Moreover, you have to focus on other details. Like, driver versions whether or not you have overclocked your GPU or CPU. And you have to know about the ability to switch between dedicated and Intel graphics cards.
What To Do With NVIDIA Control Panel
You don’t like the Nvidia control panel and don’t want to use it. But don’t uninstall it. Because it is useful for you and it has its uses. You can use NVIDIA Inspector without having to install it, there is no conflict.
When you change a small setting in one then it will reflect the same change in the other. Actually, both are designed to work together by the developer and so, there are no issues.
The NVIDIA Inspector can overclock your GPU but the NVIDIA Control Panel can’t. If you are careful then you can max out settings to crank out more performance while gaming.
You have to make sure that you have taken the necessary precautions.
You can use the NVIDIA Control Panel to change the display and 3D settings. Along with this, you can also customize settings for other Windows apps like Netflix or browser and soon.
FAQ: Frequently Asked Questions
These are some of the frequently asked questions related to the Nvidia Inspector with complete information.
Does Nvidia Inspector still work?
Although NVIDIA Inspector is a third-party app, it is still available for free on Throttle Stop’s website. NVIDIA Profile Inspector, another open-source app, will be included in the bundle.
Should you use Nvidia Inspector?
Aside from modifying your monitor’s colour and display settings, which you can do from within Windows, the NVIDIA Control Panel’s main job is to tweak your GPU’s settings, which NVIDIA Inspector does considerably better than the Control Panel.
Can you use Nvidia inspector with Intel?
No, it won’t, there isn’t, and Intel GPUs aren’t meant for gaming.
How do I overclock my Nvidia Inspector?
We have these tools here that allow us to bypass the system. Alternately, the base can be shifted. And memory clock speed, which is the graphics core’s clock speed. And this is the memory’s clock speed.
Conclusion
NVIDIA is known as the king when it comes to gaming computers. Most of the users do not like the NVIDIA control panel due to its lagging.
Then you have a better option to use the NVIDIA Inspector. You can see it has gained in popularity nowadays. It improves upon the official app. As well as, it offers some new and additional features. So, you should prefer the Nvidia Inspector to Manage your GPU.
Related Articles:
How to Fix Nvidia Container High CPU Usage
Record PC Gameplay With Nvidia Shadowplay & Nvidia Share
How to Install old NVIDIA Drivers in Windows 10
Windows Stop Code – What and How to Fix It
How to Fix Nvidia Container High CPU Usage
Which CPU Temperature Monitor Is the Best?
System Thread Exception not Handled [RESOLVED]
How To Create Microsoft Account
How To Access iCloud Photos On iPhone & Mac