
Auto Login Windows 10: Well, Auto Login Windows 10 is an easy way to save time on the bootup process. As the login screen in Windows 10 is known as the nuisance in terrible form by the customers of Microsoft. As typing of the password every time you open the computer you will get the procedure of redundant one there.
You might be thinking that why you don’t skip it. This appears as a perfect one of the solutions as a reasonable one. Though this is not as straightforward as it appears. For that, we have a solution on this Auto Login Windows 10.
What is Auto-Login in Windows 10
Firstly, you may wish for the setting of the auto-login in your Windows 10. As it will be better than wasting your time on manipulation which you can avoid easily. You must be thinking that none of the particular things is stored there in the PC and the protection of the password is moreover a paranoid of little type. Also, dealing with the screen of login at every time may appear as the slowing down of the computer for a few moments Auto Login Windows 10.
As per the fact it is not that good. The main thing here is you have to compromise with the security if you allow for the automatic form of auto-login on the PC. For beginning with this, the computer may go in the wrong way.
It may be stolen, go at a disadvantage, or can be penetrated. The reality is the machine is full of the data in the critical form. The data may include details of login, bank card, personal correspondence, and even many more. It all can mess up the life of the person if they all get lost Auto Login Windows 10.
Ways To Enable Auto Login In Windows 10
If the PC appears to be sluggish just after the startup, then the login screen will not be the culprit. Just by running the full checkup of the machine for the detection and also for the elimination of the speed-reducing issues Auto Login Windows 10.
If you have less time and are not sure of the expertise in technical form, then you can perform this by going with the AuslogicsBoostspeed as it is the best optimizer for cleaning of the computer and regenerating its performance Auto Login Windows 10.
After all, security, as well as privacy, are always on the first point. Though the choice is always of the user and it requires the enabling of auto login for Windows 10. In such a requirement, we have three solutions for it Auto Login Windows 10.
Here we have made a discussion on them:-
Configuration of the Settings of login Via User Accounts
Step 1
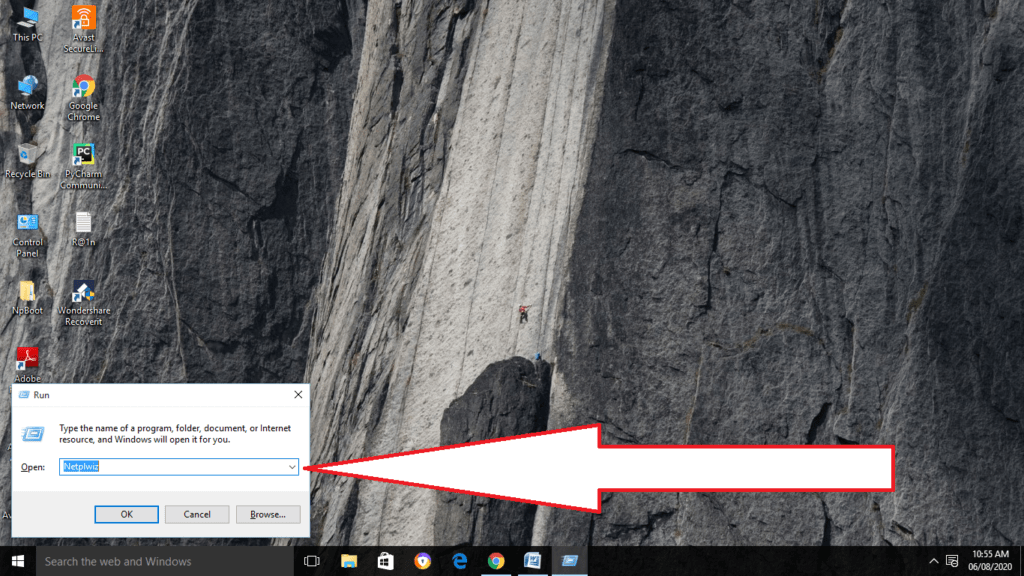
Firstly open the command box of Run by pressing the logo of Windows and the R key on your keyboard (Windows + R).
Now when the Run dialog box appears on the screen, type there Netplwiz and then click on the Enter key Auto Login Windows 10.
Step 2
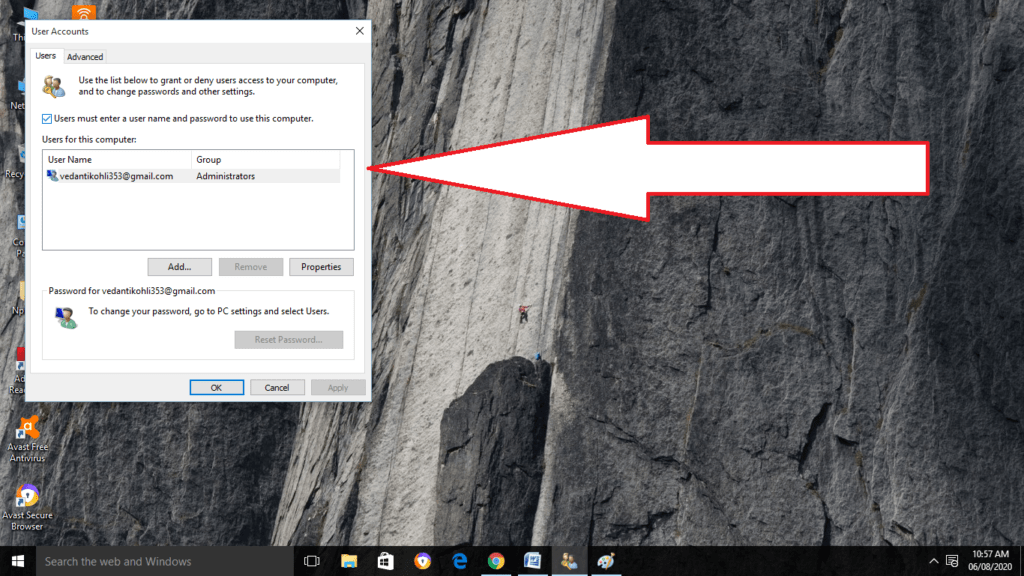
As a result, the dialog of UserAccounts will appear there. Do the selection of the user account and then uncheck there the option which is User must enter a user name and password to use this computer. After that, click on the Apply button for viewing the box of Automatically sign in Auto Login Windows 10.
Step 3
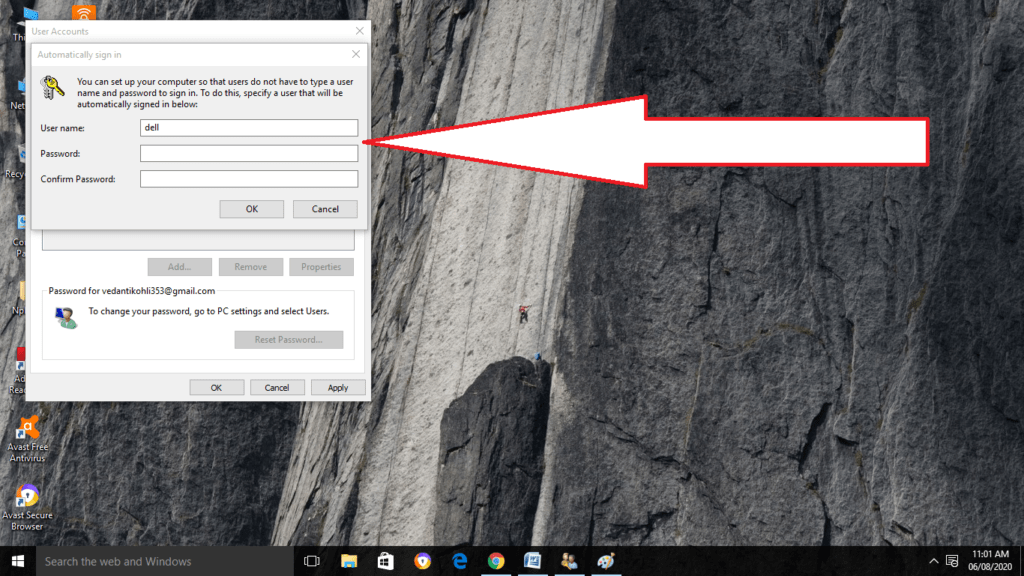
Now in the dialog of Automatically sign in, type there the password and then do the re-entering of the password for the confirmation of it Auto Login Windows 10.
Step 4
Lastly, click on the OK button there.
Step 5
When you will do the saving of the changes, do the restarting of the PC for viewing the results.
Similarly, if you would like to undo the changes, and want the protection of the password on the computer, then do the disabling of the auto-login. You have to enter the user name and the password to access the computer option and then check to it.
Change the Options of Sign-in Via Settings Menu
Step 1
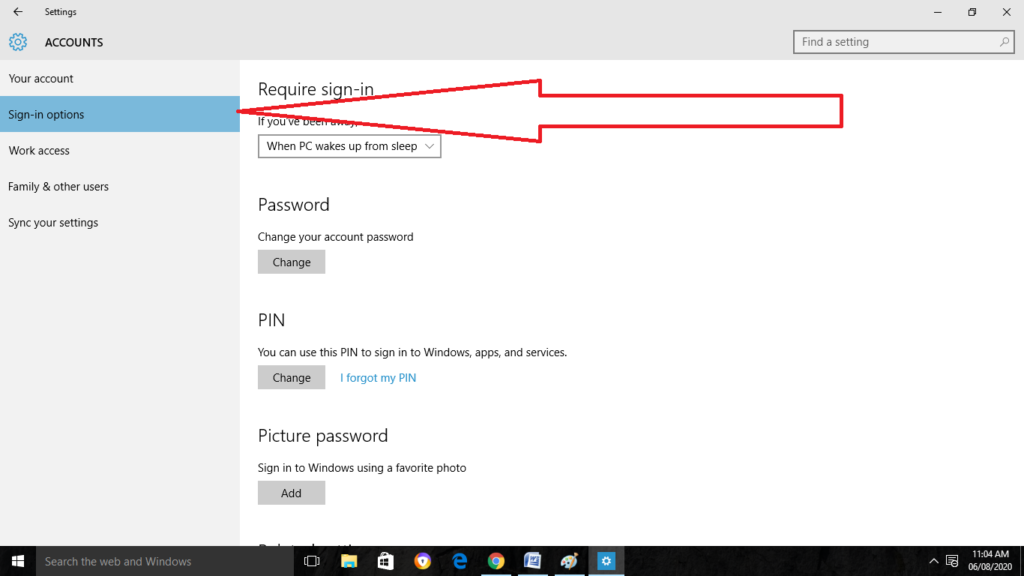
Firstly, visit the Start menu and then go to the Settings page. Then open the Accounts in it.

Step 2
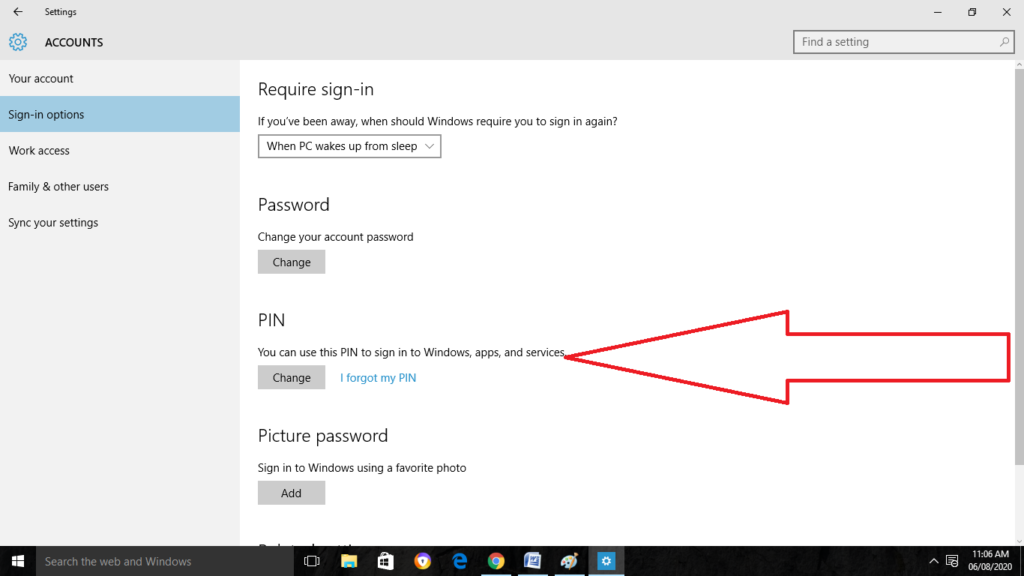
After that, open the sign-in options and then select the Require sign-in option and then do the selection of Set it to Never.
Step 3
Then visit the PIN section shown on the downwards side and set an easy pin.
This method is not there in a few of the devices and persists on the login screen.
Modifying of the Windows Registry To Enable Auto Login
It requires full caution. The editing of the registry can be a bit risky. The system can maybe fall apart. For beginning with this, take a proper backup of the required files for the prevention of data loss in a permanent form. You can also take the required data to another PC with the use of transferable cable or through the feature of HomeGroup.
Other than this, you can also go for the cloud solution which is OneDrive, Google Drive, and even many more. You can also go through the portable storage device. More information can also be searched for such requirements. For saving of time as well as the effort, do the use of special backup software which is AuslogicsBitReplica.
Before the steps of this procedure, let’s understand the backing up of the registry. It is necessary before applying the login in automatically.
Step 1
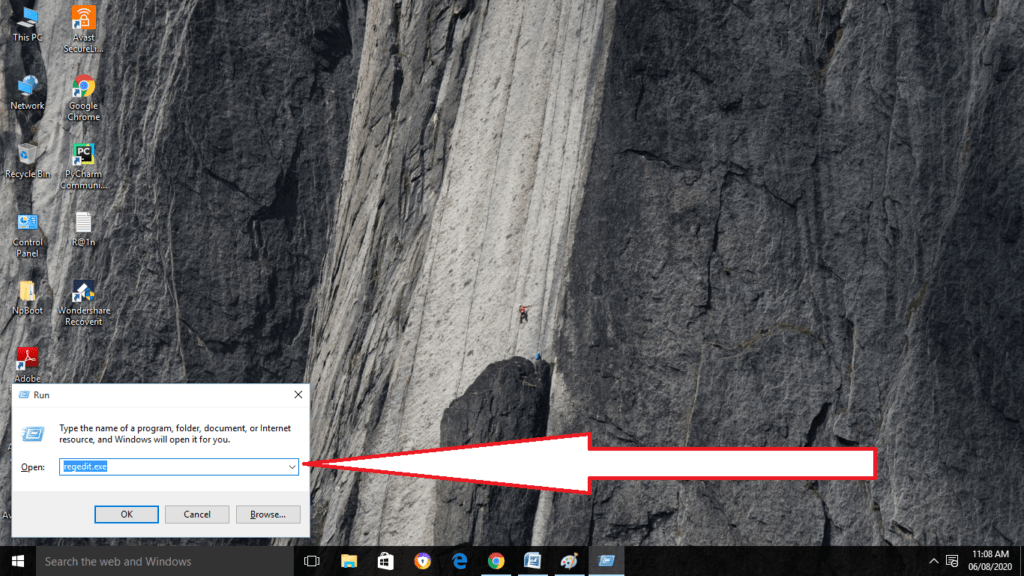
Firstly, open the Registry Editor by clicking on the logo of Windows and also the R key together (Windows + R) and when the Run box appears, type there regedit.exe.
Step 2
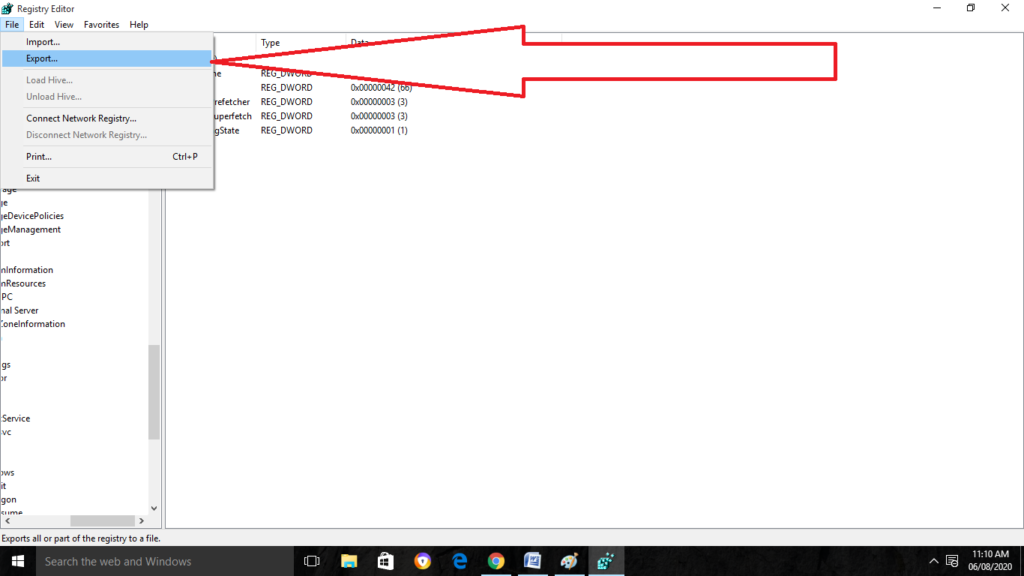
Now in the given Registry Editor, do the selection of the keys of which you want to do the backup. Then select File and then Export option.
Step 3
After that, do the selection to which of the place you want to do the backing up of the file. For that, do the selection of the name for it and then click on the Save button.
Setup Auto-Login Via Registry
Now we have the steps of automatic sign-in by the use of Registry
Step 1
Firstly, open the Registry Editor. For opening it, type Regedit in the search box which you will open through the Start menu or can run the command box and then click on the Enter key. Now click on the Yes button when the box of User Account Control (UAC) will appear there.
Step 2
Now in the given Registry Editor, do the navigation of the given key:
HKEY_LOCAL_MACHINE\SOFTWARE\Microsoft\Windows NT\CurrentVersion\Winlogon
Step 3
Then on the given right side, go for the search of entry name which is DefaultUserNameand then do Double-clicking on it. Take a proper check that the Microsoft account appears under the box of Value data.

Step 4
Now again on the right side, search for the entry name of DefaultPassword. If it is not there, then do the creation of it by doing a right-click on the given space. Click on the New and then click on the String Value. Do the renaming of it as DefaultPasswordand then enter the password in the given box of Value data. Then click on the OK button.
Step 5
Now restart the PC and your Windows 10 will log in to the account when without the password need.
Wrapping Things Up
Here we understood how you can easily follow the way in automatic logging into your Windows 10 account. We discussed various methods of logging in. Go through with this and tell us as a comment on it. Also, read our more topics for more knowledge.
How do I set up an account such that it always logs me in?
After pressing the Windows Key and the R key simultaneously, type netplwiz into the box and then press Enter. When the dialogue box opens, go to the Users tab and click it. To access your user account, locate the list of all users on your computer and click on your name. Untick In order to use this computer, users will first be prompted to provide a user name and password.
How can I set my computer to automatically log in once it has been restarted?
Launch the Settings application on your personal computer, then choose Accounts to view the menu for configuring your accounts. On the next page, click on Sign-in settings in the left sidebar, and then switch on the feature that reads Use my sign-in details to automatically complete setting up my device after an update or restart. This will ensure that your device is always properly configured after either of these events.
What are the steps for adding to startup?
While the location of the file is still open, hit the Windows logo key in combination with the letter R, then type shell:startup and choose OK. This opens the folder titled “Startup.” The shortcut to the application should be copied from the place where the file is stored and pasted into the Startup folder.
What should I do if I don’t have the password for Windows?
On the keyboard, open the Run box by simultaneously pressing the Windows key and the R key, and then type “netplwiz.” Make sure you press the Enter key. Choose your account inside the User Accounts window, and then de-check the box that reads “Users are required to provide a user name and password in order to access this computer.” To apply the settings, click the button.
Related Articles:
- How Much is $1 in Robux? [Explained]
- 8 Ways to Fix Discord Screen Share Audio not Working
- How to View Passwords on Mac – Step by Step
- How to Install Bluetooth Driver in Windows 10
- How To Close Amazon Account – Step by Step Guide
- How To Share Google Map Location
- How to Turn on Google Assistant On Any Device
- How To Cancel NetFlix on iPhone – Step By Step
- How To Call Someone Without Showing Your Number