This is a comprehensive guide based on how to turn off or disable Windows Firewall on Windows 11,10, 8, 7. Learn how you can easily disable the Windows Firewall whenever you want without having a hassle.
What does a Windows Firewall do?
The Firewall is the most important point when comes to network security to secure the data of your computer or devices. Technically, the Windows firewall is a shield that protects your device from harmful malware threats that can easily able to damage your computer system in no time.
Benefits of Windows Firewall
There are multiple benefits of using the Windows Firewall on a Windows PC or Laptop. According to Microsoft, the Windows Firewall allows you to block or unblock all network connection requests, as well as help block computer worms and viruses and create a security history of attempting to connect to your Windows PC.
Certain benefits of using Windows Firewall.
- Protect your computer from malware threats.
- A secure connection cannot be established until the Windows Firewall is turned on.
- You cannot able to download unsecured files or documents onto your PC.
- Any other relevant point to consider related to the benefits of Windows Firewall.
Reasons Behind Turning off Windows Firewall
There are multiple reasons to turn off the Windows Firewall and some of them are given below.
- Most of the time there are certain programs such as video games that cannot run until you disable the Windows Firewall.
- To download certain unsecure file or document you need to turn off the Windows Firewall.
- In case you want to connect any unsecured network to your PC or Laptop that cannot be possible until the Firewall is turned on.
- Are there any other relevant points to consider.
How To Disable Windows Firewall on Windows 11, 10, 8 and 7
If you want to disable the Windows Firewall on Windows 10 or later versions of the operating system. Then don’t worry in this comprehensive guide we have covered the entire topic with step-by-step instructions. There is a simple process from which you can disable Windows Firewall in a few seconds and easily enable it whenever you need it.
Windows 11 and Windows 10:
Windows 11 and Windows 10 are the most updated Windows operating systems with new features such as Action Center, Cortana, and many more. In terms of Security, Microsoft has introduced a new feature called Windows Defender that blocks all unsecured connection attempts.

But still, the Windows Firewall is still available on both versions of Windows and you can easily enable or disable it without having a hassle.
Here are the steps you need to follow in order to disable Windows Firewall on Windows 11/10.
Go to the Search Bar enter Control Panel and open it.
Now you need to navigate to the System & Security.
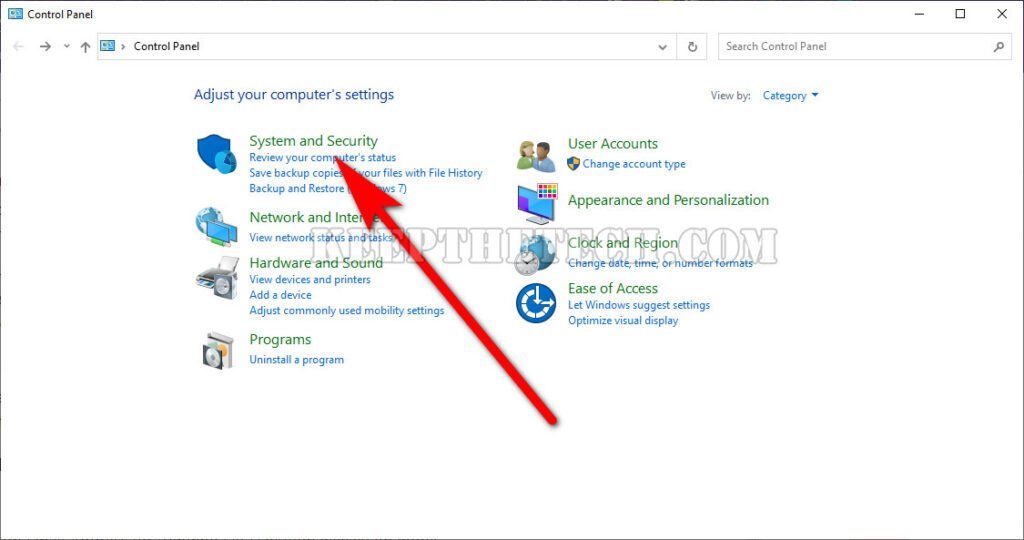
You need to select the Windows Firewall from the given options.

Simply select “Turn Windows Firewall on or off” from the left sidebar.
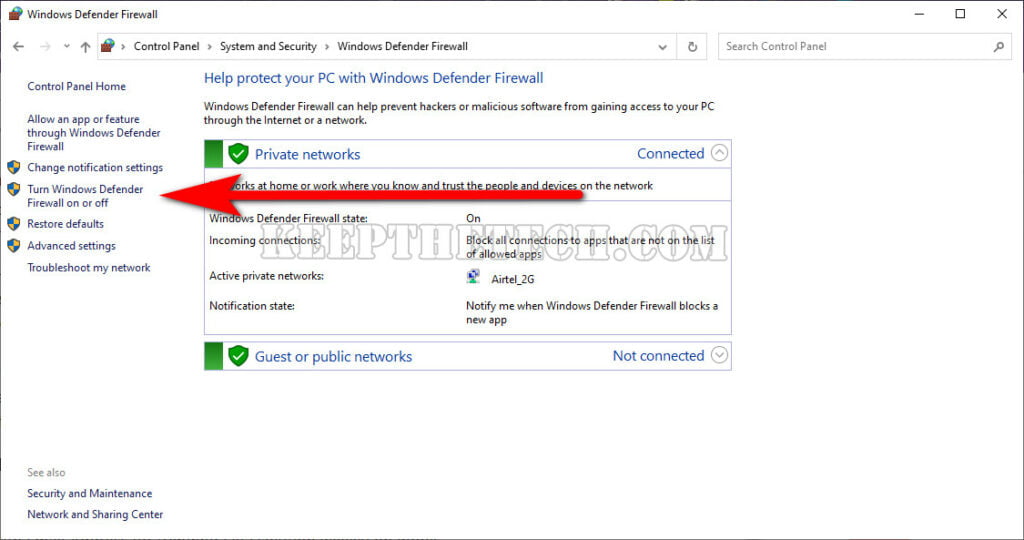
Now, choose the red cross icon with the text “Turn off Windows Firewall (not recommended).”
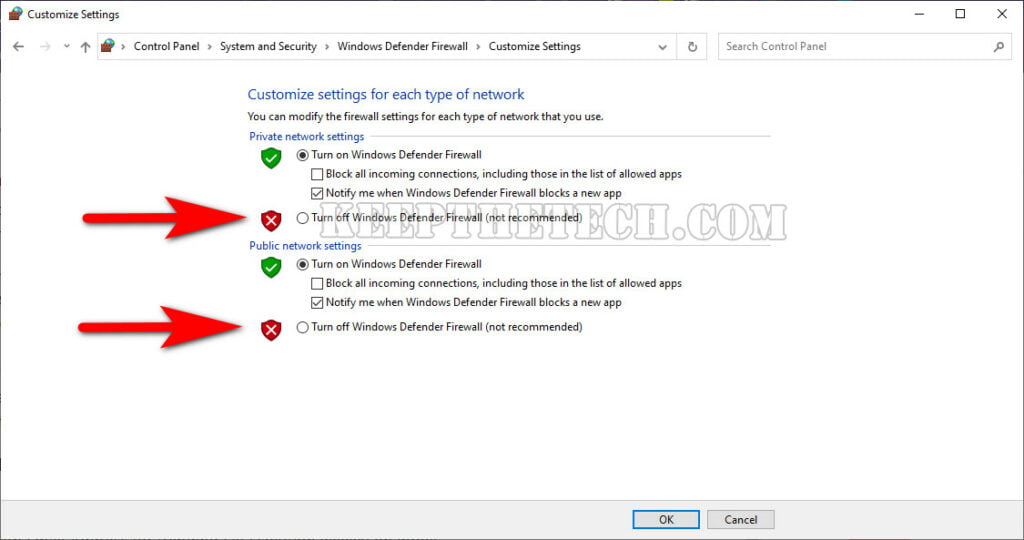
Lastly, select the “OK” button to save the changes.
Enabling Windows Firewall on Windows 10/11
To enable the Windows Firewall on the Windows 11 or later version you simply need to access the Windows Firewall settings from the search bar or Control Panel and select the Turn Windows Firewall on or off > Turn on Windows Firewall any time you want.
Windows 8 and Windows 7:

Windows 8 and Windows 7 are the most used Windows operating systems along with Windows Vista and Windows 8.1. The interface of Windows 8 and 7 has lots of differences along with features such as the stylish icons of the Start Menu, taskbar, and many more.
But both version of Windows carries the Windows Firewall program and you can easily able to disable the Firewall on Windows by simply following the below-given step-by-step instructions without having a hassle.
Follow the below steps in order to turn off Windows Firewall on Windows 8, 8.1, and 7.
1. Go to the Start Menu and open the Control Panel.
2. Now access the “System & Security” > Windows Firewall.
3. From the left sidebar choose “Turn Windows Firewall on or off.”
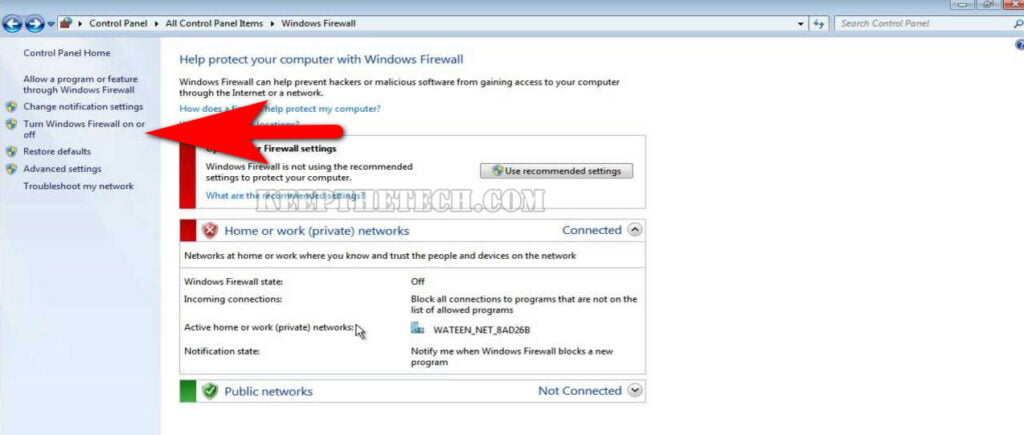
4. In the last select “Turn off Windows Firewall (Not Recommended)”
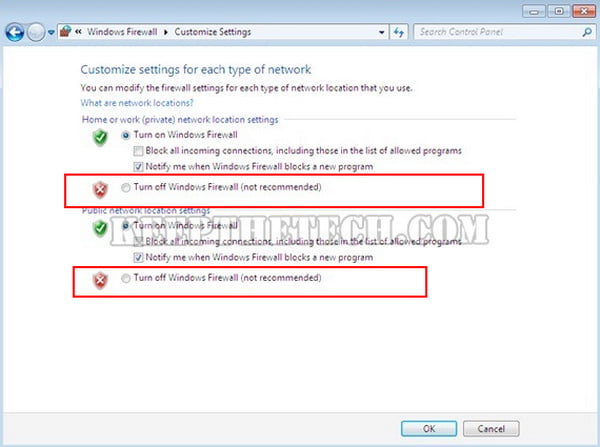
5. Once done, simply hit the OK button to apply changes.
Windows Vista and Windows XP:

If you own Windows XP and Windows Vista on your PC then here are the steps you need to follow in order to turn off the Windows Firewall without having a hassle.
- Go to the Control Panel from the Start Menu.
- Navigate to the System & Security from the available options.
- Select the Windows Firewall > “Turn Windows Firewall on or off.”
- Now choose “Turn off Windows Firewall (Not Recommended).”
- In last select the “OK” button.
By following the above-given steps you can easily able to turn off the Windows Firewall without having a hassle.
This is the end of this ultimate guide, hopefully, you find this article helpful.
Related Articles:
How To Password Protect File or Folder in Windows 10
How To Create & Run PowerShell Script On Windows 10