
This is a compressive guide based on how to run System File Checker in Windows 11, Windows 10, Windows 8, and Windows 7. But most Windows users don’t know about the System File Checker. Here is a short description of it.
What is a System File Checker?
Technically, The System File Checker is a Windows program that allows users to search for and repair broken Windows system files.
If you have some issues with your Windows systems such as the error in an email account accessing on a default web browser or some other things like corrupted files. A lot of Windows users run System File Checker to restore corrupted files or missing files.
Recently some Windows users upgraded their computer with Windows 10 which is Microsoft Edge’s new default browser. Microsoft asks community users who have problems accessing their Verizon email account.
So read the given below steps to run the System File Checker in Windows 7, Windows 8 / 8.1, and Windows 10 to restore missing files for any program.
Run System File Checker In Windows 11

In this article, we are going to tell you how you can easily run a system check on your computer system running on Windows 8 to Windows 10. In addition, we also going to tell you how you can repair corrupt files or folders of your computer system using the system file checker tool.
System File Check In Windows 8 and Windows 8.1
If you using limited-time Windows Operating systems such as Windows 8 and Windows 8.1 and you want to access the System File Checker to scan your computer. Follow the below-given step-by-step guide to run the system file checker in Windows 8 and Windows 8.1 only.
1. Open the command prompt by the Start Menu.
2. Move the mouse pointer to the lower-right corner of the screen in the “Search Bar”. Now Type Command Prompt in the search box and select “Run as administrator” (As shown in the given screenshot).

3. If you are prompted for an administrator password > Type the password
Note: The administrator password is required when you set up a password while creating an administrator account on the Windows system. Otherwise their no need for a password.
4. Now enter this command line to run System File Check.
sfc /scannow

Run System File Checker in Windows 7, Windows Vista / XP
If you using older versions of Windows such as Windows 7, Windows Vista, or Windows XP. In this case, you can still access the System File Checker. Simply you need to follow the below-given step by step guides for running the System File Checker tool in Windows 10
1.Open Start Menu > Search > Type “Command Prompt“
2. Run as administrator > An administrator password
3. At the command prompt type (sfc/ Scannow).
4. Hit the “Enter” button after writing the command line in the command prompt.
Tips: The SFC /scan now command will scan all protected system files, and replace corrupted files along with cached copy that is located in a compressed folder at System32.
How To Repair Corrupt Windows System Files With DISM Scan To Fix SFC Files

The SFC scan will automatically replace or modify the Windows corrupt files. However, sometimes you will see a message on the command prompt while running an SFC scan “Windows Resource Protection found corrupt files but was unable to fix some of them”.
For this, try to restart your computer and again run a command prompt and if this also doesn’t work for you then also try booting with recovery disc and use this command line to start a DISM scan to fix SFC files.
However, you should not normally use a DISM scan but in case SFX can not work for you then, in this case, you can use the DISM system scan.
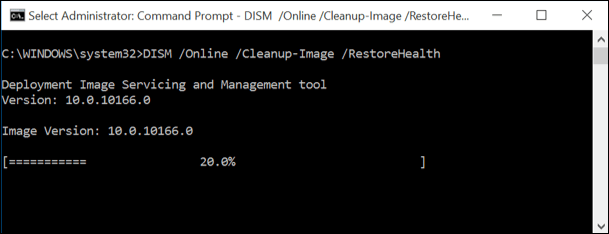
1. Go to the Command Prompt and enter given following command line as shown here.
DISM /Online /Cleanup-Image /RestoreHealthThe scanning process will take approx 2 to 5 minutes after completing the scanning process restart your computer system.
This is the end of this short guide, hopefully, you find this article helpful.
Related Articles:
How to Fix the RTC Connecting on Windows 10?
Windows 10 Taskbar Not Working – 8 Ways to Fix It