The computer displays a “No Audio Output Device is Installed” error message after getting updated Windows 10 or any other update in Windows running on Windows 10, 7, or 8 operating system.
Don’t worry here in this article we are successfully troubleshooting this issue so you can perform the below-given guide to get rid of the no audio output device installed error.
In this article, we are going to show some step-by-step instructions and working methods to fix no sound no computer problems. All you’ve to do is read this article to the end and perform these methods on your computer or laptop system running on Windows.
How To Fix “No Audio Output Device Is Installed” Error
Basically, Windows users get this error after updating Windows. The computer has gone mute after the update in other words “no sound no computer”. Follow the below-given step-by-step troubleshooting guide to fix the issue without having a hassle.
Run A “Troubleshoot Sound Problems”
Well, Microsoft Windows has an automatic troubleshooter that helps Windows users to fix issues and errors automatically without having a hassle.
For this type of sound error in Windows, you can use Troubleshooter to fix the error without having any changes to the Audio Driver settings.
Step 1:
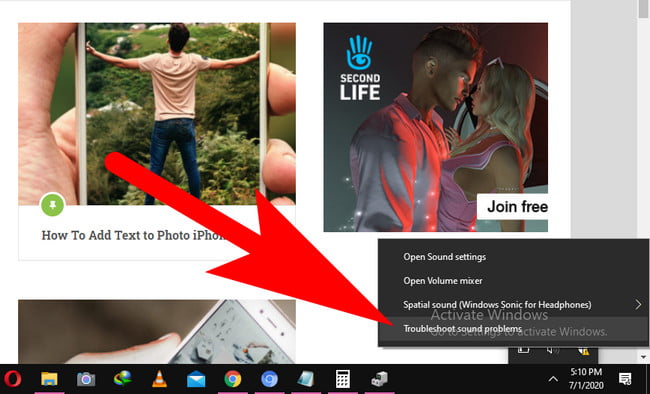
Go to the right corner of the desktop taskbar. Select the Speaker icon and right-click on it then select the “Troubleshoot sound problems”.
Step 2:
The troubleshooting tab will automatically start locating the error. Else you’ve to choose the device that you want to troubleshoot. Click on the “Next” button
Step 3:
If the Troubleshooter tab, shows any error on the display screen then click on the “Apply Fix” button to make the changes.
Lots of time these errors come due to make minor changes that take place in the system background. So by running a Troubleshooter the error may quickly fix. However, in case the troubleshooting has not worked for you. Then move to the next method given below.
Enable, Disable Or Update Audio Driver
“The No Audio Output Device is Installed error starts showing on your computer because Audio Driver stops working. So we have to make some changes to the Windows Audio Driver.”
Follow these steps to make changes to Audio Driver in Windows 10, 7 or 8
Step 1:
Go to the Start Menu and use the search bar to locate and open “Device Manager”.
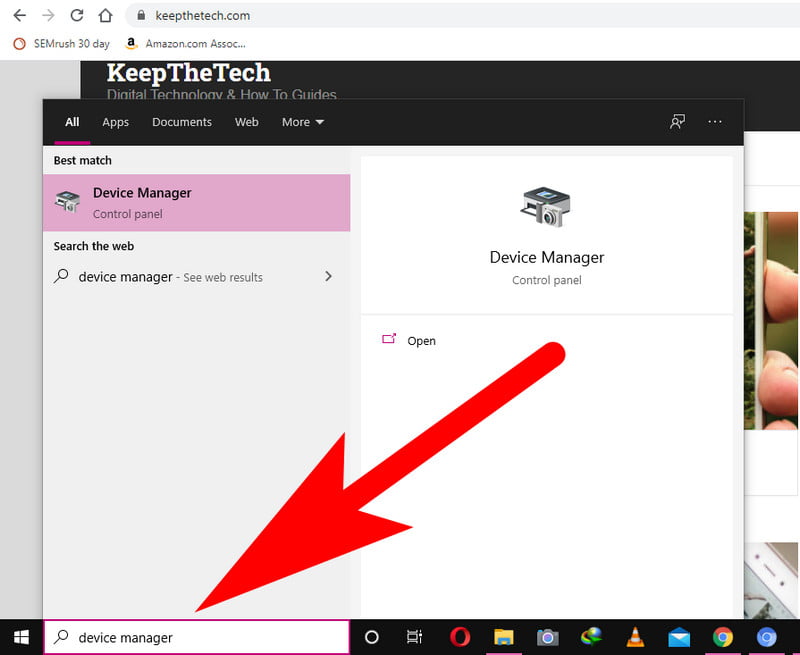
There is an alternative to opening Device Manager in Windows by going to the Control Panel. Else you can use the search bar to open it.
Step 2:
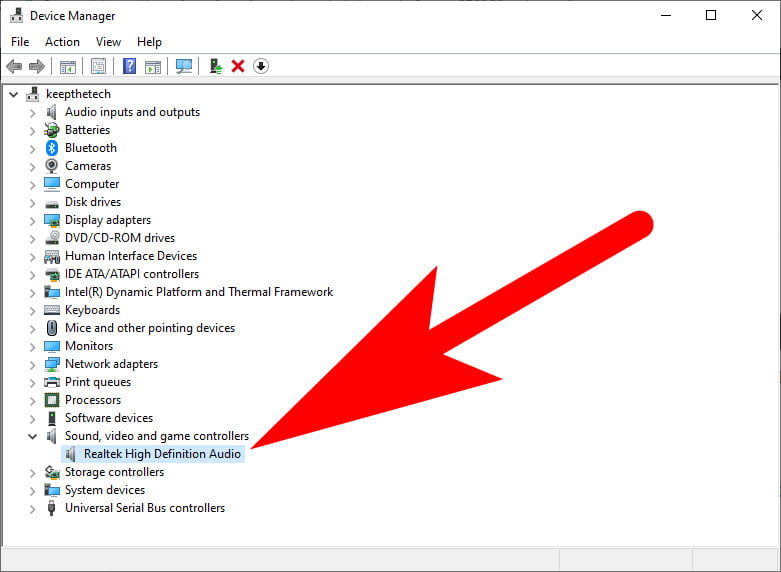
From the list of devices in the device manager tab. You’ve to select “Sound, Video & Game Controllers”. (as shown in the available screenshot)
Step 3:
No double on the Audio Driver such as “Realtek High Definition Audio” as shown in the above screenshot. This will open the Audio Driver Properties.
Step 4:
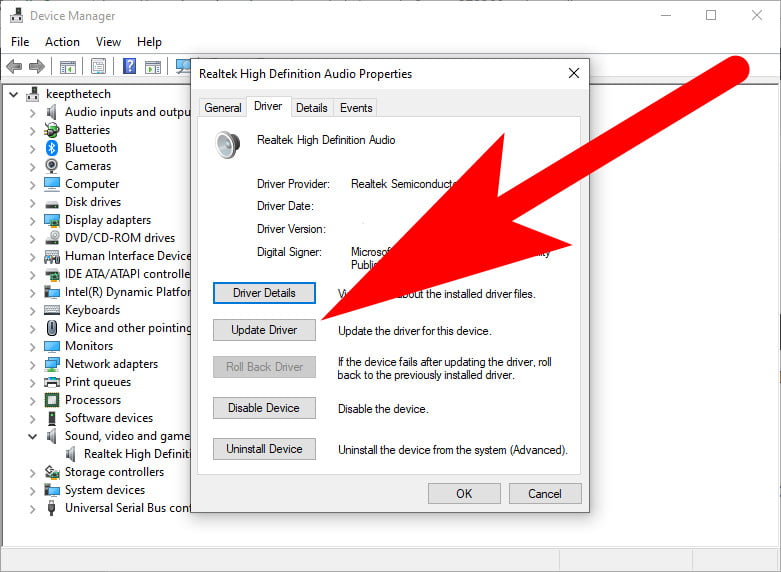
Go to the Driver tab, and Tap on the Update Driver button to update the driver with the latest version.
Step 5:
All done! Click on the “OK” button to save the changes.
Now after performing all the above 5 steps you will have to restart the computer to make affect the changes. After getting the system bootup. The computer is ready to use again to try to play a music file to test if the error was fixed or not.
Point to be Noted:
In case, if still, get no audio the device is installed error, Then again go back to the Device Manager > Audio Driver > Disable Driver.
Now by disabling the Audio Driver in Windows, all the bugs that cause the error will be automatically removed. After a few seconds Enable the Audio Driver. Hit the “OK” button to save changes once again.
Check Playback Device Settings
Sometimes, due to playback device settings, the computer goes to mute mode. You can easily fix this by going through the given below steps.
Step 1:
Go to the right corner of the desktop taskbar. Select the Speaker icon and right-click on it then select the “Playback Devices”.
Step 2:
Check the Audio device in which you trying to listen the sound is checked as a Green mark. This will show the default settings. If not then select the device and right-click on it as choose “Set as Default”.
Step 3:
Hit the “OK” button to save the changes.
Point To Be Noted:
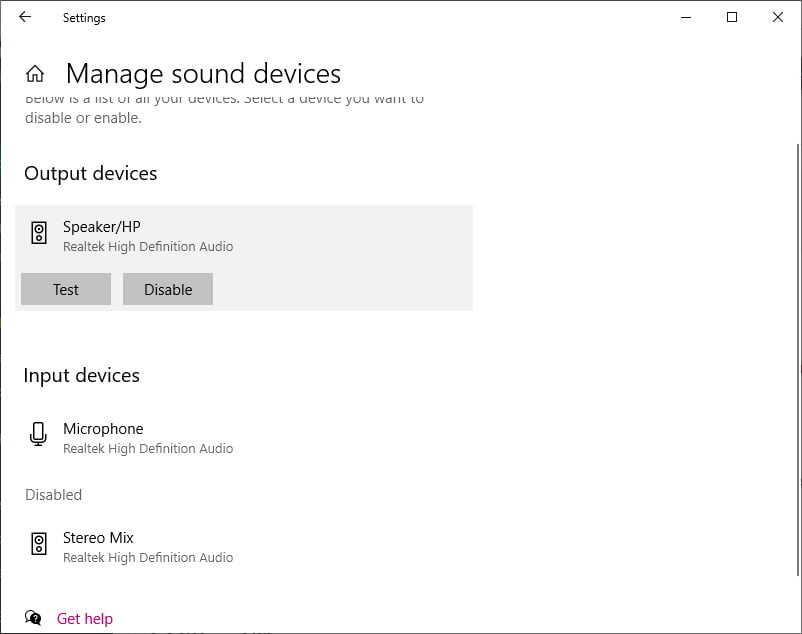
In Windows 10, go to the Speaker icon and select “Sound Settings” > “Sound” > Manage Sound Devices. Now select the sound device that you want and hit the “OK” button to make changes.
Additional Tip:
Check Cable Connection: You must check if the sound device cable connects to the correct port and if the connection is secure. In case the sound device is not detectable then try to reconnect the device cable again.
Wireless Sound Devices: Make sure the wireless device that is connected to your PC or laptop is successfully paired with your system.
Hopefully, you find this article helpful to resolve the “No Audio Output Device is Installed” error on your PC or laptop running on Windows OS. For more related articles read our Headphones not working windows 10: fix it now and you can also read this how to fix Entry Point not found in windows and many more.