
DirectX is a very important tool for various multi-media applications, especially for games. So basically uninstalling DirectX is not a good idea. In case, if you want or need to disable DirectX because of any application or program. Then we going to tell how you can easily turn on or turn off DirectX on Windows 10.
Disable DirectX On Windows 10
A few days ago, lots of Windows 10 readers ask for step-by-step guides for disabling DirectX on Windows 10. So here are the guides by following these steps you can disable DirectX on your Windows system.
Step 1:
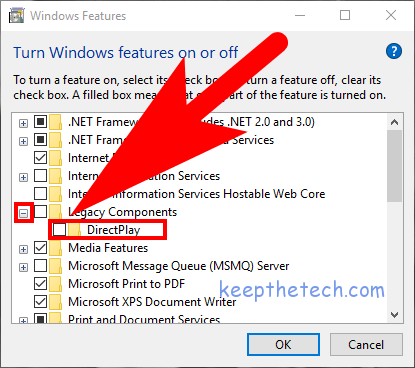
Go to the search bar and type “turn windows features on or off” and open it.
Step 2:
Navigate for “legacy components” after this press “+” to expand features.
Step 3:
Now remove the checkbox form “DirectPlay”.
Step 4:
Press “OK” to disable DirectX 12 on Windows 10.
Now you’ve successfully disabled the DirectX on your system. In case, if you want to know what version of DirectX you’ve installed on Windows 10 keep reading.
What Version of DirectX do I have windows 10
If you want to know what version of DirectX you’ve installed on your computer running on Windows 10. You can easily find it out using a simple command line. There are just steps to know which DirectX version is installed on your PC or Mac.
Step1:
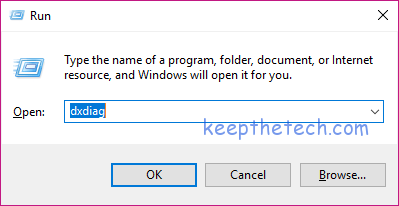
Press “Windows + R” keyboard keys to open “Run” dialogue box.
Step 2:
In the box, type “dxdiag” and hit Enter button.
Now you can easily able to see which version of DirectX is installed on Windows 10 system. It should be enabled automatically if it is installed on your computer.