If you’re Audio Renderer Error. Please Restart Your Computer message when you playing any video on a web browser such as Google Chrome. According to the sources, the number of Windows 10 users reporting this error on different web browsers while playing YouTube Videos.
Most of Windows users said the error starts appearing after updating to the latest version of Windows 10 updates or changing the audio device.
In case if you’re also facing this issue on your Windows 10 laptop or PC. Then don’t worry we are here to help you out with the Audio Renderer Error.
How to Fix Audio Renderer Error on Windows 10
There are some methods or solutions you can try to fix this error on Windows 10 while you play any video on YouTube or any video streaming website.
1. Disconnect / Reconnect The Audio Device
The easiest way to fix the Audio renderer error. Please restart your computer message is by disconnecting and reconnecting the audio device on your computer system.
All you’ve to do is unplug the audio device from your computer CPU or the laptop USB slot and reconnect it.
Most Windows users, try this method and the issue is resolved without performing any technical tweaks in the Windows Settings.
Basically, most of the time there are some dust particular comes in contact of the Audio device jack from this, the device cannot be properly connected to the system.
2. Try Audio Troubleshooter on Windows 10
This is the second solution if you’ve tried the disconnect and reconnect the audio device when you get the Audio Renderer Error message. The Troubleshooter is the most common errors resolving app that comes in Windows as pre-installed.
To access and launched an audio troubleshooter on Windows follows,
- Press the Windows + I keys from the keyboard to open Windows Settings.
- Go to Updates & Security.
- From the left side menu panel. Select “Troubleshooter.”
- Choose the “Playing Audio” and click on “Run the Troubleshooter.”
- After complete, the process restarts the PC.
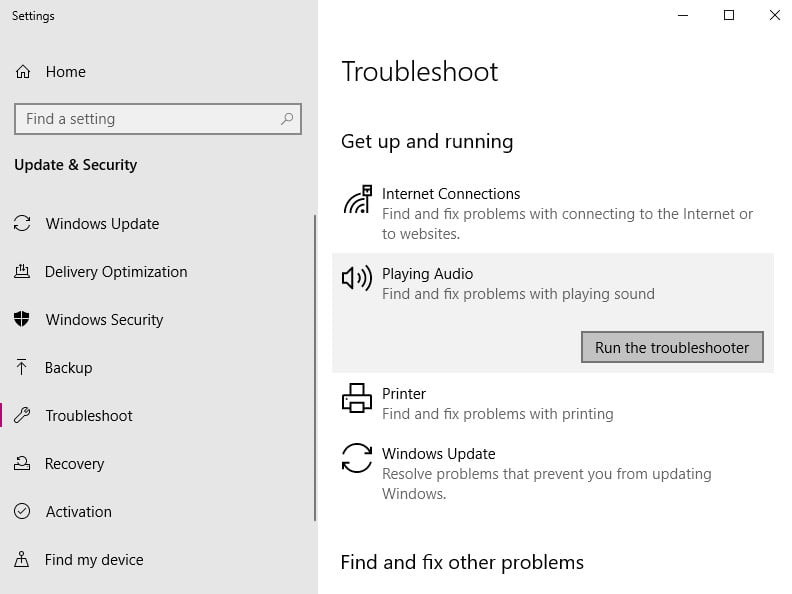
Most of the time some temporary files or malware cause this type of error while playing audio files on Windows. Audio Renderer Error can easily be resolved by using the Troubleshooter without having a hassle.
3. Update the Audio Driver
If you’re using Windows 10 then you regularly get and install the latest Windows updates. But in case you’re not updating your Windows 10 when the updates arrive on the Windows Settings > Updates & Security > Check for Updates.
In this case, you can manually, update the drivers that may cause an issue because you’re using the latest version of the Audio driver for playing the audio files on the system.
To Update Audio Driver on Windows as follows,
- Go to the Start Menu and search for “Device Manager” and open it.
- Scroll down and select to expand the Audio Driver (audio inputs and outputs)
- Right-click on it and select “Update Driver”.
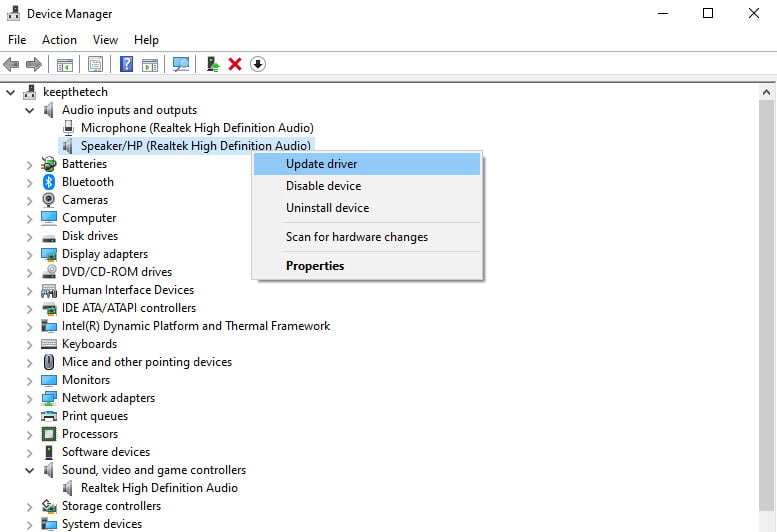
4. Disable and Re-Enable Audio Driver
You can also try this method its most worked for me so many times. If I get any audio error on my Windows 10. Then I simply disable the audio driver and re-enabled it. Doing so fix some bugs and the audio driver start working fine again.
In the case of Audio Renderer Error, I prefer to perform this method. Go to the Start Menu and use the search bar to open Device Manager > Audio Input & Output > Disable Driver > Enable Driver.
5. Particular Fix For ASIO Driver on Windows
If the audio error on Windows 10 is due to the simple rates when the Cubase is running. Then to fix it you can easily synchronize them.
1. Go to the Right bottom corner where the time and date displayed. Click on the Upside Arrow.
2. Right-Click on the Speaker icon and select “Sound”.
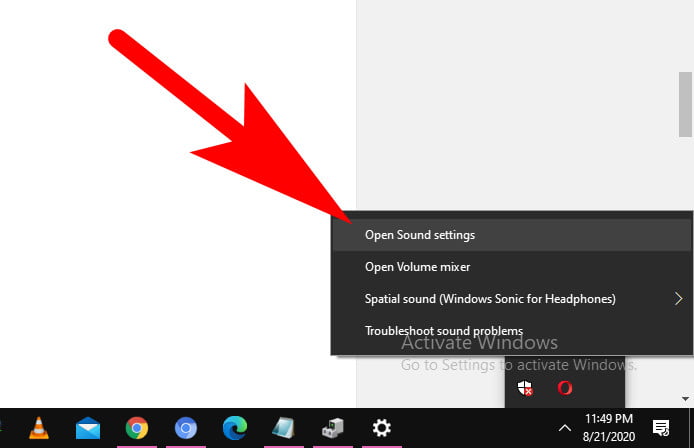
3. Go to the Sound Control Panel, select the desired audio device and then go to Proprieties.
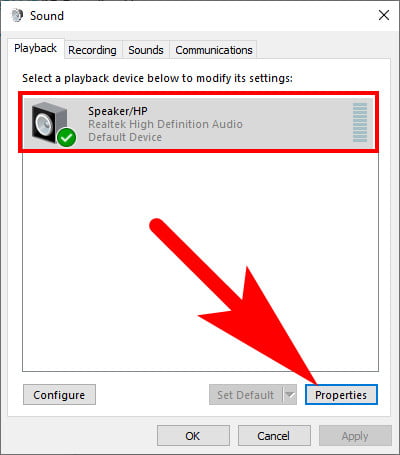
4. Select the “Advanced” tab and then under Default Format select the sample rate you wanted to set up.
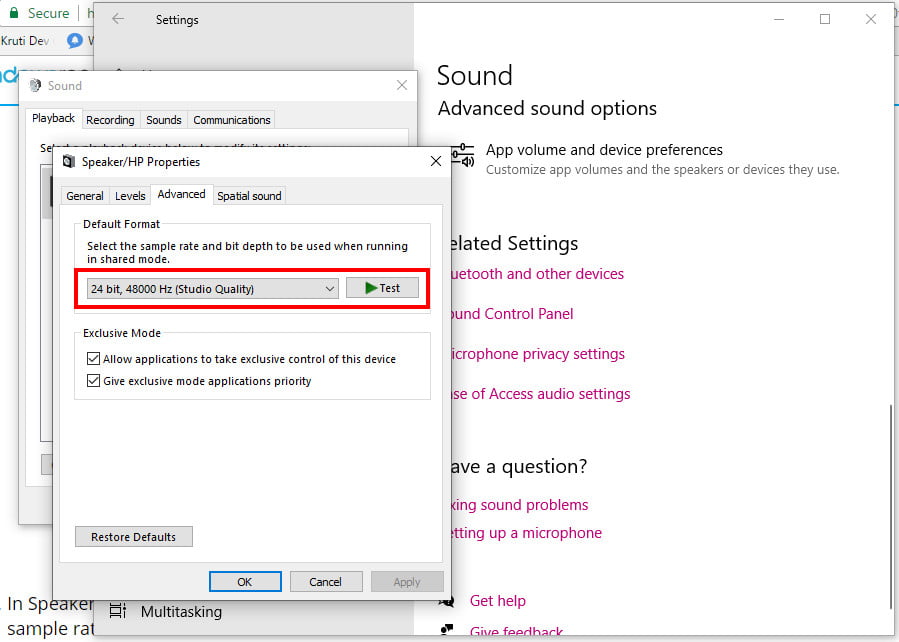
5. Now, open the ASIO Driver. Go to the Settings > Audio tab.
6. Under the Sample Rate, set the same sample rate that you’ve set up on step 4.
7. Restart your PC and see the magic.
Fix for Dell Computers & Laptop
Some of the Dell laptops and desktop users said this method worked fine for the Audio Renderer Error on Windows. According to the dell users, the error is in the BIOS and the only fix is to Update the BIOS.
In case you don’t know how to update BIOS on a Dell laptop or computer then use this Dell Community Support Web Page to go through step by step process without having a hassle.
Why do I continually receive audio renderer errors?
Disconnecting and then re-connecting your equipment, regardless of what it is, will sometimes provide a temporary solution to a problem. This is as straightforward as it seems. In the event that you are working with wired headphones, a jack, or a USB, you will need to remove them and then re-plug them in when you get the Audio renderer problem. Please restart your computer message.
How can I get rid of the audio renderer problem that keeps popping up on my Mac?
Restarting your computer is the only way to cure this issue, just as it is the only way to fix the Blue Screen of Death error. Whether you are using headphones, you should follow these steps to solve the Audio Renderer error: Disconnect the headphones from the audio jack or the USB, wait one minute, and then rejoin the device. Check to see if this helps. Kindly restart your computer.
What does audio renderer error mean?
The generation of a finished digital result from a particular kind of input is referred to as the rendering process. The phrase “graphics and video” is what the word refers to most of the time, however, it may also apply to audio.
How can I repair the audio renderer error without having to restart the computer?
A number of customers who were impacted by the problem have claimed that they were successful in resolving it without having to restart the machine or run the troubleshooter. As it turns out, you may be able to fix the problem by going into your device manager and turning off all of the audio adapters, then turning them back on after a few seconds have passed.
Related Articles:
How to Fix Entry Point Not Found In Windows
How To Download Harry Potter Font (Windows, Mac)
How to Install And Run APK File in PC
15 Beat Maker Software and Apps To Use
How to Change Google Background