Enable IP Routing In Windows 10 From Command Prompt
Looking for a guide to know how you can turn on or off IP routing on Windows 10. Well, we have you covered here in this guide with complete information for enabling and disabling IP Routing on Windows PC.
What is IP Routing and What are its Uses?
IP Routing is the process of sending data packages from one host to one network to another host. Imagine You send some things from your computer to another computer using Routers and this process is called IP Routing.
In this guide, we discuss how you can enable IP Routing on your computer in a few steps without taking any computer expert advice.
How To Turn on or off IP Routing On Windows 10
Follow the below step-by-step guide to enable IP Routing on Windows 10.
Step 1 :
Open Command Prompt by Start Menu.
Step 2 :
In the Command box type “Regedit” and hit the enter button.
Step 3 :
Registry Editor pop up, Navigate to the “HKEY_LOCAL_MACHINE” > SYSTEM > CurrentControlSet >Services> Tcpip >Parameters > IP Enable Router.
Step 4 :
When you reach the file name “IP Enable Router” right-click and select “Modify” and change 0 to 1 and hit the OK button.
Step 5 :
Now go to the StartMenu and in the search box type “Run” and hit the enter button.
Step 6 :
In the Run box type “Services.msc” and hit the Enter button.
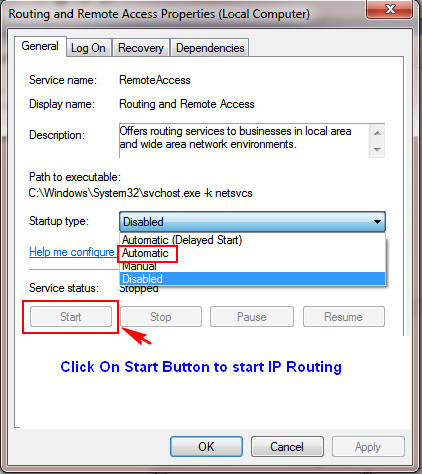
Step 7 :
Now navigate to Routing and Remote Access service, right-click to open its properties.
Step 8 :
Go to Startup Types Change it to Automatic click on Start and hit the OK button.
This is the end of the guide hopefully it may come in handy for you to learn how to enable IP Routing on your computer without any trouble.
How To Use Windows Movie Maker In Windows 10 | How to Recover Undeleted Files Windows 10 | 10 Best Windows 10 Partition Manager | Turn On Touchpad Windows 10 | How to Free up RAM on Windows 10 | 5 Ways For How to Check PC Specs
Comments are closed.